Linutop Kiosk Documentation
Copyright © 2025 Linutop SAS
|
|
Linutop Kiosk software is a secured web browser and a Digital Signage player designed for PC or Raspberry Pi. More about Linutop Kiosk player. |

- Table of Contents
- 1. About Linutop-Kiosk
- 2. Secure Web Browser
- 3. Digital Signage Player
- 4. Digital Signage with Linutop TV
- 5. Network settings
- 6. FAQ & Advanced configurations
- 7. Quick configurations - Tutorials
Chapter 1. About Linutop-Kiosk
Overview
Linutop Kiosk is a powerful software for quickly setup a secure web access, a digital signage or a MultiMedia Player. The Linutop-kiosk application is included in Linutop OS and available for PC or Raspberry Pi
|
|
Linutop-Kiosk in kiosk mode allows you to setup:
|
|
|
Linutop-Kiosk in digital signage player mode allows you to setup:
|
The Linutop Kiosk offers 3 operating modes:
- 1- Web Kiosk browser mode, for secure Internet access.
This mode allows to restrict various elements to make the browsing session very secure.
- 2- Digital signage player mode, for video, images, PDF, web pages display.
This mode allows to easily configure slideshows (playlist) of web pages, streams, pictures, PDF, sound, and videos locally or remotly.
- 3- A Web Kiosk Browser and Screen Saver Digital Signage Player Mode.
Both modes can be used at the same time, allowing to use the digital signage mode as a screen saver when the kiosk is not used.
|
The Linutop Kiosk is divided in two software:
1) is the main application (player). In the menu, entry.
2) is the configuration manager. In the menu, entry. This application is executed with the administrator rights. It defines how the main application will behave.
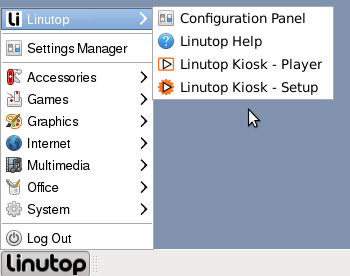
Linutop Kiosk is included into linutop OS Operating system. |
Linutop Kiosk is accessible from the Menu |
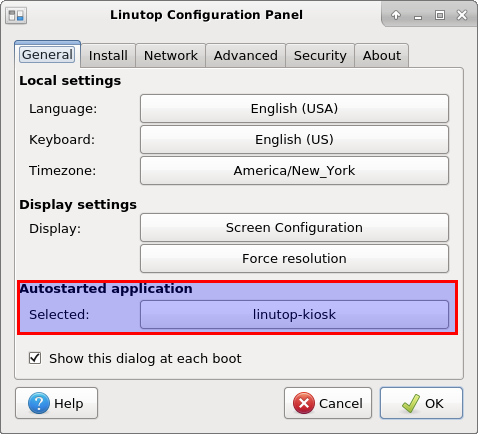
Getting started with Linutop Kiosk General tab configuration
Starting the configuration tool will display the following screen:
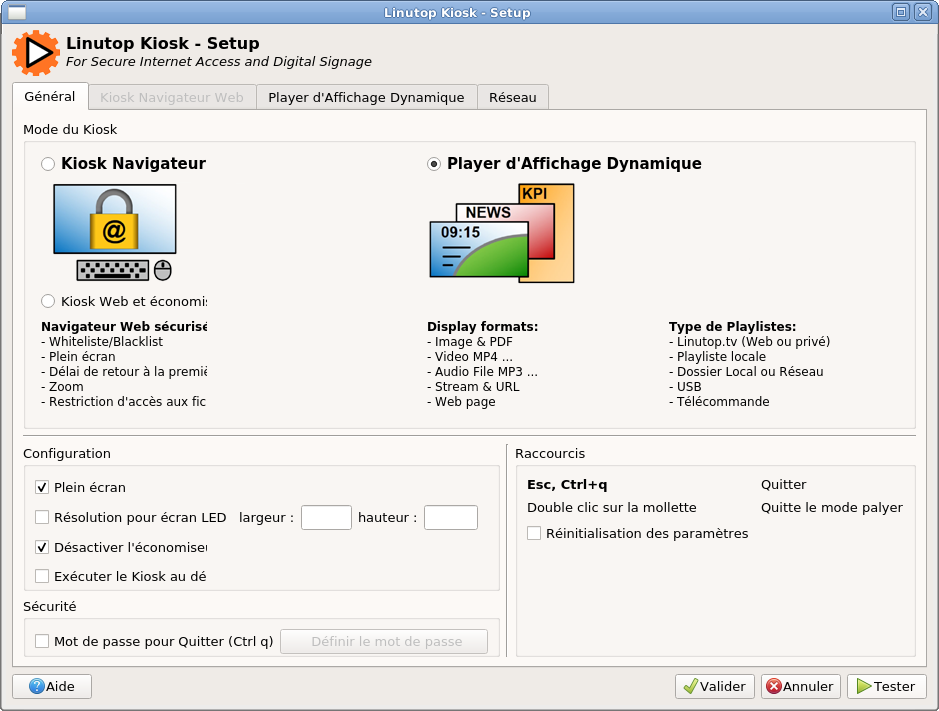
The top section of the tab (Kiosk mode) lets you choose the mode:
- Digital signage of videos, images and web pages
This choice will enable the tab. The application displays the choice of playlist sources and the content of a playlist in a loop.
- Web Kiosk browser for secure Internet access
This choice will enable the tab. The main application will behave like a standard web browser, with the restrictions you'll setup (whitelist or blacklist of URLs, maximum session duration...).
- Web Kiosk Browser and Digital signage as screen saver
This choice will simply enable all the features of the main application. At the end of browsing session, the digital signage feature will start to act like a screen saver.
The next section (Configuration) allows to setup a few things:
- Fullscreen
If selected, the Kiosk will start in fullscreen mode.
- LED screen control panel
This option places the Player at the top left of the screen with a resolution defined by its width and height. This allows to directly accommodate the largest number of LED panel.

- Disable the system screen saver
If selected, the default system screen saver will never start.
- Run the kiosk at startup
If selected, the Kiosk will automatically start when the system boots. It also restart this application in case of a crash.
- Password to exit the application
If selected, a password will be requested. This password will be asked to the user when he tries to exit the application. (ESC or CTRL + q or Double click the wheel in "dynamic display" mode)
- Reset configuration
If checked, all values will be reset by default.
Chapter 2. Secure Web Browser
Web Kiosk browser tab
The tab of the configuration tool lets you define how the web browser should behave. It is split in 3 parts:
- : buttons to display to the users
- : websites restrictions
- : some less used options, hidden by default
Parameters
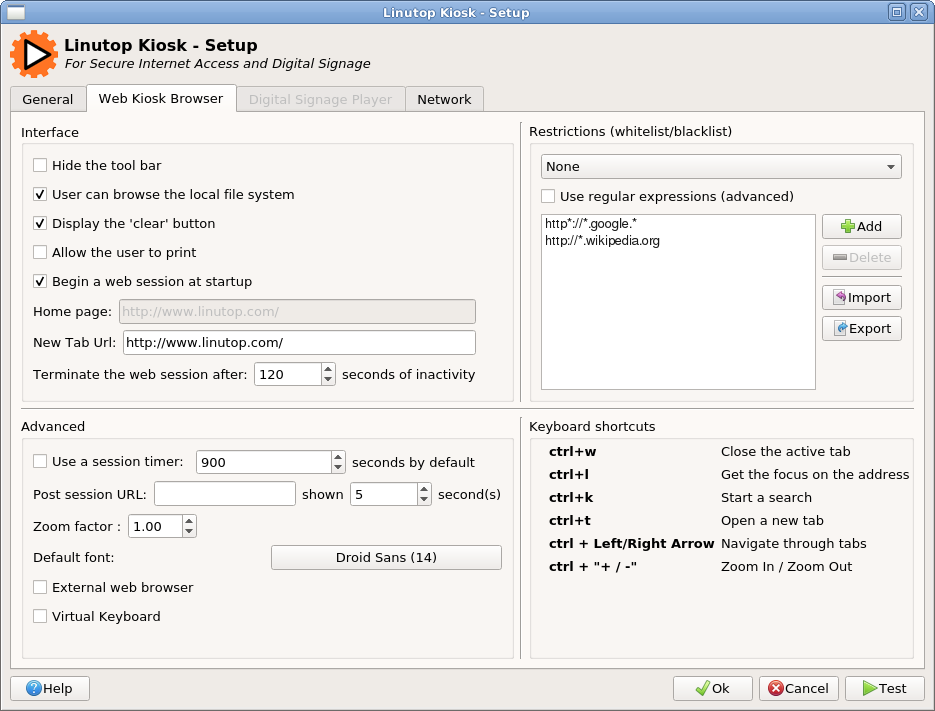
Interface
These parameters define how the Kiosk will behave, and what will be shown to the user.
- Hide the tool bar
Do not display the navigation toolbar. This setting can be activated if you allow navigation on only one website (a catalog of your shop articles for instance).
- User can browse the local file system
If checked, the user can acess the file system, and acess a usb key for example for downloading purpose.
- Display the 'clear' button
If checked, a button will let the user explicitely clear his session. This will clear all cookies, all site authentications and clear the browsing history.
- Allow user to print
If checked, the user can print a webpage
- Begin a web session at startup
If unchecked, the application will wait for an external event to decide to start a web session.
- Home page
URL to display when a session starts.
- New Tab URL
URL to display when a new tab is opened.
- Start the screen saver / Restart a web session after...
Defines how long (in seconds) the application should wait before cleaning the current session if the user is inactive. Setting this parameter to 0 will forbid the application to clean the session.
- Zoom Factor
Zoom Factor allows enlarge the web pages. A 1.0 Zoom is 100% and 2.0 is 200%.
- Default font
Allows to select the default font used when displaying web pages (in kiosk mode and in digital signage mode).
Using an external browser
If the external browser option is checked, the application browser will be replaced by an external one to maximize navigation compatibility (by default, it is Firefox on PC or Chromium on XS (raspberry Pi)). This option will launch the external browser with the selected url.
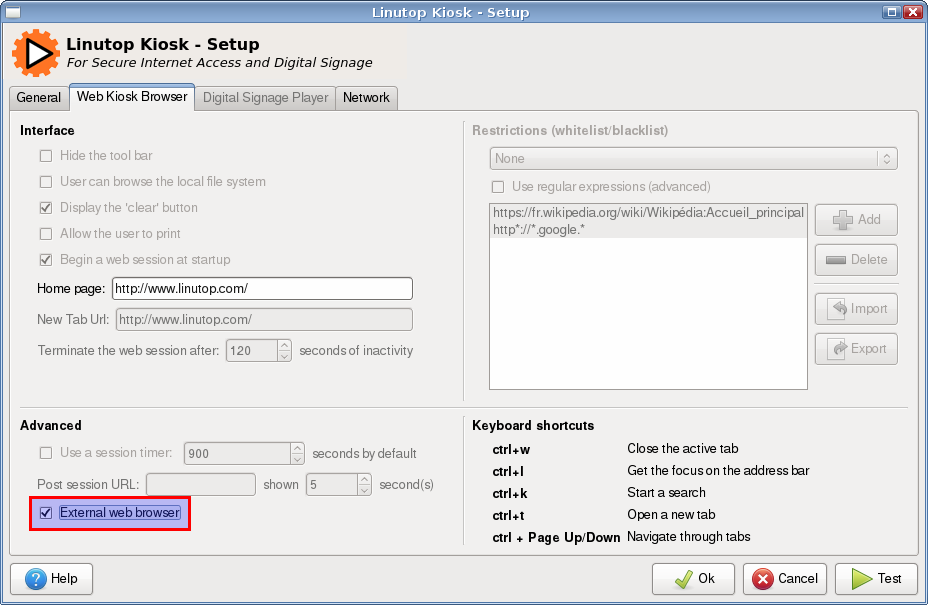
To improve security in this configuration, you will have to secure the external browser first. to do so you can use plugins like R-Kiosk or mKiosk for firefox
Using another web browser (chromium for example)
To use another web browser you need to edit this line in the main configuration file (/home/linutop or pi/.config/linutop/preferences)
external_browser_cmd=chromium-browser --kiosk %u
--kiosk enable the chromium built-in kiosk option (fullscreen)
%u allows to pass the URL to the chromium browser
Using another application in kiosk mode
This feature allows to start an application in secure kiosk mode you just need the launch command configured in the main configuration file (/home/linutop or pi/.config/linutop/preferences)
external_browser_cmd=commandlinelauncher
Restrictions
The Kiosk can be configured to forbid access to some Internet resources. You can define a list of URLs that will be used either as a blacklist (list of forbidden URLs, everything else is allowed) or as a whitelist (only the listed URLs are allowed). You can obviously choose to not restrict the URLs.
The list uses a set of URL patterns. The * has a special meaning. It symbolises any letter, as many as you want. For instance, to allow anything hosted by Google, you can use:
http*://*.google.*This will allow to use both http and https protocols (http*://), on any subdomain (*.google) of any country (google.*).
The patterns can be defined as regular expressions. If you don't know what that is, you just don't need this! If you are familiar with regex's, have fun!
By default the file:// protocol, allowing the browser to act as a file browser, is forbiden. To enable this feature, check the checkbox.
Web Kiosk browser Security tips
If you use the Linutop Kiosk for a public access point, you probably want to check a few things to secure the browser and the system.
- Make sure to set a password in the tab.
- Start in fullscreen. This will prevent the user to access the rest of the desktop. And if the password is set, it will also remove the menu bar for maximum security.
- Activate the cleanup of session after a certain time. This will prevent complaints from users who didn't clear their session themselves.
- Make sure to enable the Linutop OS Lock mode to secure the entire system (system passwd, no reboot, useless desktop, hidden menu...).
Using the browser
The browser offers standard features for such an application:
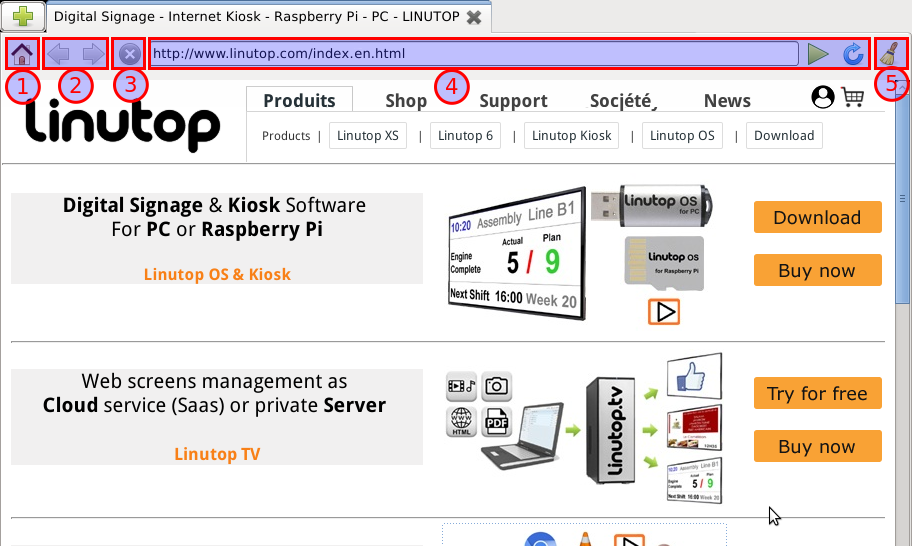
- 1: go to home page
- 2: history navigation
- 3: stop loading the page
- 4: URL bar
- 5: session cleanup
Chapter 3. Digital Signage Player
The tab of the configuration tool defines how the display part of the application should behave.
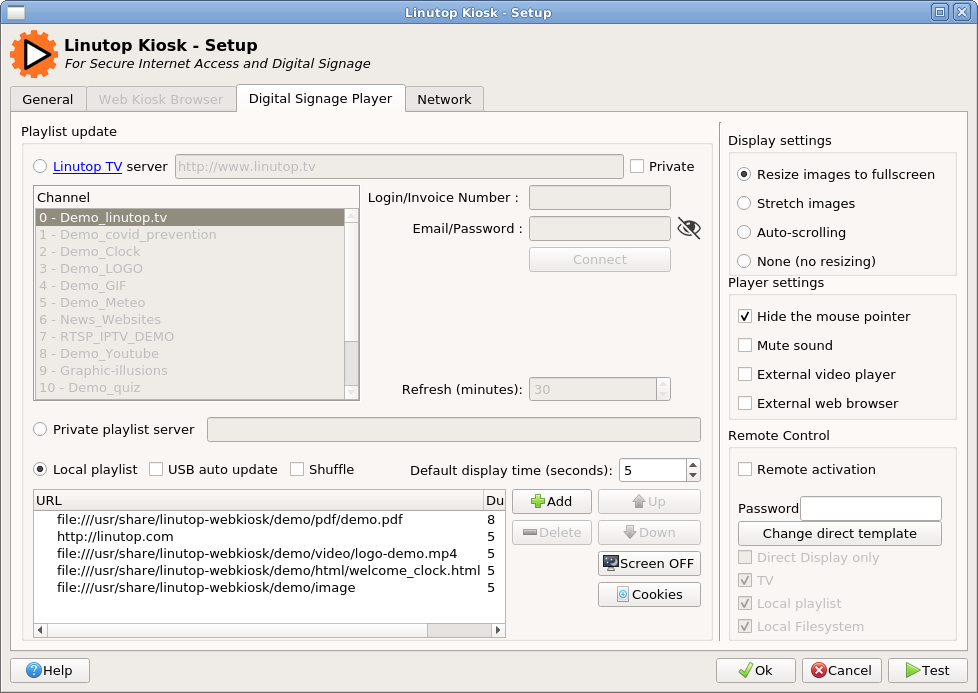
Playlist and Formats
The section frame allows to setup how the data to be displayed should be retrieved. Two distinct methods can be used:
- Online update will download a playlist and associated content from a Linutop TV service or private server. This configuration is intended to manage several screens a schedueld broadcast.
- Local update (USB, remote control, local or network directory update and static playlist) can be used to manage directly one screen.
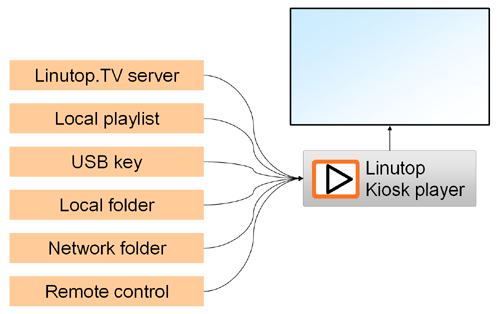
Playlist management
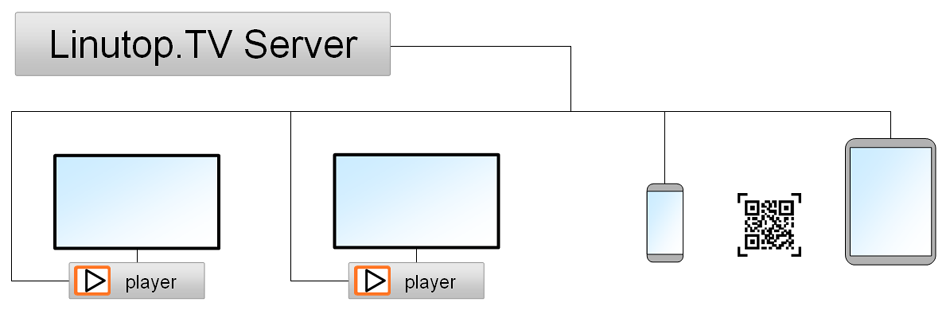
Linutop Kiosk is connected to a Linutop.TV server :
- Linutop.TV Service of Server via Internet (SAAS) or Local allows to manage and scheduled each player with a timmed playlist and its content.
Linutop Kiosk is configured with a local playlist:
- Playlist locale - list Items to be displayed and their display time
- Local folder - Display the files of a local folder
- Network folder - Display the files of a Netwotk folder
- USB - Diplay all the content of USB key after copying it
- Remote control - Manage the player from a web page
Playlist Behavior, interactive sequencer and programming:
- Loops Play Pause, display trigger. comming soon.

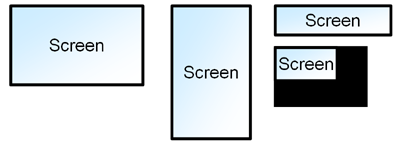
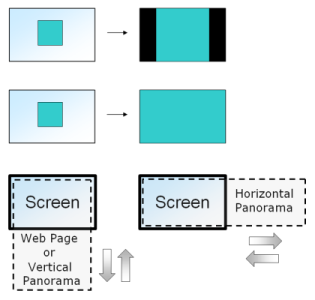
Screen formats
|
Linutop Kiosk can accommodate any screen resolution and orientation (landscape, portrait) for Image, PDF, web page, some limitations might appear for video depending on hardware limitation. Video HD (720p, 1080p), Video 4K, resolution, screen orientation and other settings can be configured in the linutop configuration pannel. |
|
Linutop TV Server Digital Signage Management (WEB or Private)
By selecting button, If you are connected to the Internet, the public demo channels will appear in the window, you can display their content with a double click.
The Linutop TV service makes it easy to generate such playlists. If you have a Linutop TV account, the tab of the Linutop Configuration Panel offers a simple way to configure the Linutop Kiosk.
can be installed in a player or a VM on your local network.
Benefits are:
- Web Interface, accessible locally on the ntework
- Centralized playlist management for one or multiple screens
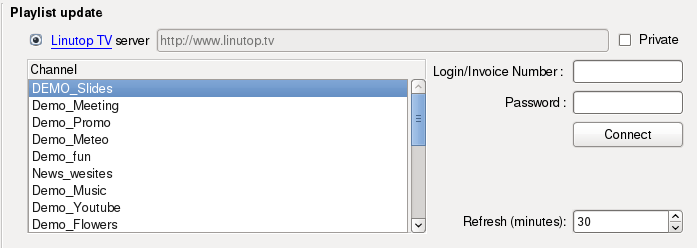
Connected on the internet, Linutop TV service can be automaticaly updated. For a demo, you can just double click on a channel.
Private playlist server
A playlist can be downloaded from a web or ftp site. To do so, check the button, and set the URL to access the file. This remote playlist uses an XML format, offering advanced features. See the Scheduler section for details.
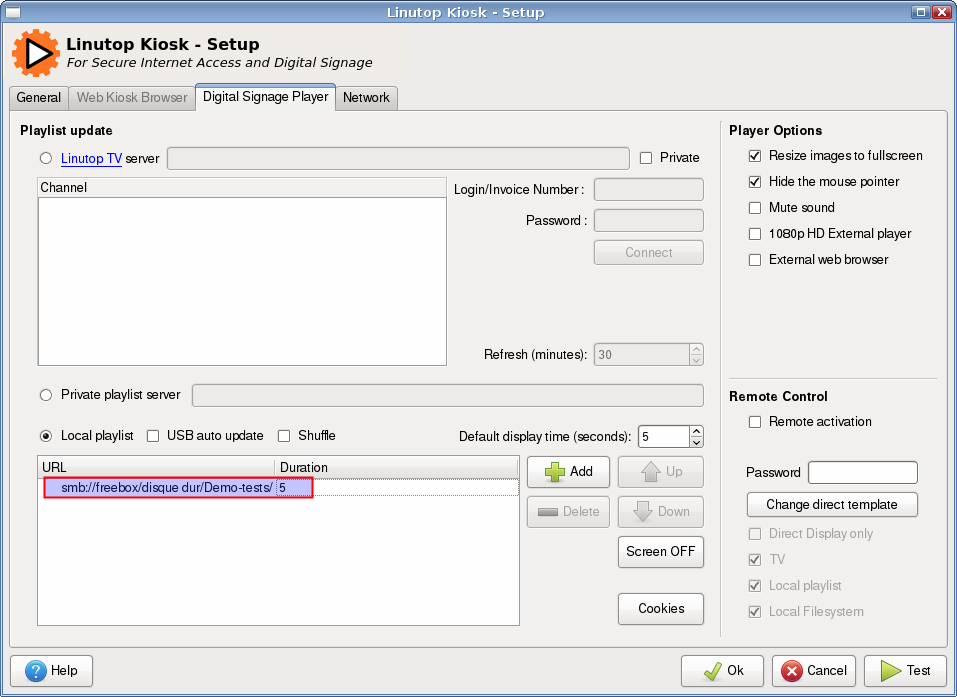
Local playlist (and shared folder)
With local playlist, you can directly create a playlist.

To add items to this list, simply press the button and select the file from the file manager. The type of the file (video or image) will be detected automatically using the file name extension or protocol. URLs must be prefixed with the access protocol (usually http://, rtsp://, smb:// or file:///).
Local or network Directories (folders) can be added to a local playlist and all it's playable content will be shown with the same duration (except videos).
Items can be ordered in the tree using the arrow keys. You can define how long each item will be displayed (in seconds) in the column. Videos don't use this parameter, they will be entirely displayed.
The and buttons allow to manipulate the list as well.
If you display web pages, you might need to perform logins on the websites. Two possibilities can be used, depending on how the website authenticates you.
If the site uses HTTP authentication (usually a popup window asking for a login and password), the login and password have to be included in the URL:
http://mylogin:mypassword@mysite.com
- If the authentication mecanism is more integrated in the site (Google login for instance), you will need to start a web session to set up things. This can be done by clicking the button. This will start a web browser. The navigation arrows will let you access the sites defined in your playlist. Log in sites, and close the window. The login information will be kept and used during the slideshow.
Adding a RTSP network stream can display a video:
rtsp://wowzaec2demo.streamlock.net/vod/mp4:BigBuckBunny_115k.mov
A local broadcast folder can be synchronised with an online cloud storage service (Dropbox, Google Drive, Apple iCloud, Microsoft One Drive, ...) allowing display content management via a cloud shared folder.
file:///home/pi/cloud-folder/
Adding a network folder can be done with Thunar file manager on the network by copying the files location's network address.
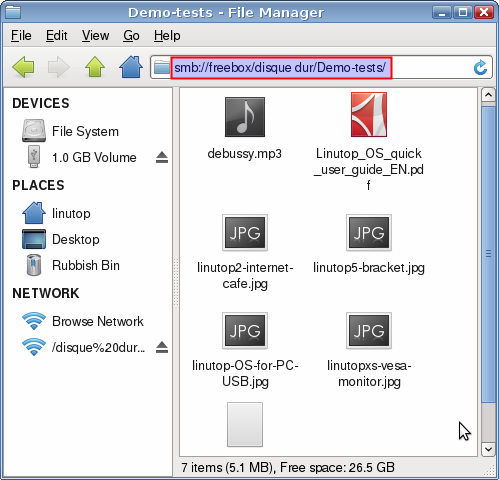
Or by entering manually the folder path :
smb://folder/path/
The button allows to program the screen sleep mode automatically.
Screen OFF - From: 20:00 TO: 08:00 0
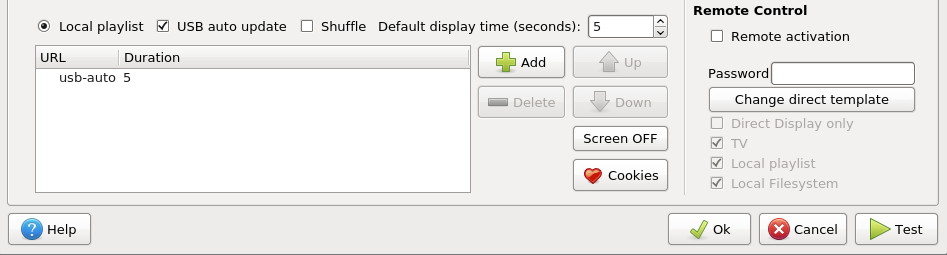
USB key auto update
If this option is selected, the data can be automatically updated when a USB key is inserted on the Linutop machine.
The data on the USB stick must follow some simple rules (). The files to display / play must be present at the root of the USB key (or in a folder with the name of the password of the remote control). The update is done automatically. Once the update is done the player will restart the display, then you can remove the key. Fixed elements can be added in addition to the local playlist.
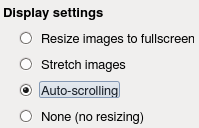
Display settings
|
|
|
Digital Signage Player settings and external Player or Browser configuration
- Hide the mouse pointer
If checked, the mouse pointer will disappear during slideshows.
- Mute sound
If checked, the videos will not output sound.
- 1080p External HD Video player,4K or more
This option run an external video player using full hardware acceleration. On OS XS (Raspberry Pi) this allows maximum video resolution of 1080p (video can't be stopped during playing),(Some HD videos might require more GPU memory to work properly and prevent a black screen). On PC, this option launch by default MPlayer and require adding acceleration software package. Other command line base hardware accelerators can be configured to accommodate other graphic cards.
external_player_cmd=omxplayer.bin %f
omxplayer.bin launches omxplayer.
%f transfers the video or stream filename to be displayed.
To rotate a video on a Raspberry Pi. It is possible to compleet an argument in the commande line in the kiosk configuration file (/home/linutop/.config/pi/preferences), this option can rotate the video if omxplayer is not oriented as the desktop.
external_player_cmd=omxplayer.bin --orientation 90 %auto
omxplayer.bin launches omxplayer.
--orientation 90 rotate 90 degre the video.
%auto transfer allthe other parameters automatically (position, size, strech...) and video or stream file to display.
VLC library is used Internally by default, however it is possible to use VLC player as an external command in the kiosk configuration file (/home/linutop/.config/pi/preferences), Exemple VLC use.
external_player_cmd=cvlc --fullscreen %f
cvlc lauche vlc player without interface.
--fullscreen display the Vidéo in full screen.
%f transfer video ou stream file to be displayed
- Use an external web browser.
You can use an external browser for maximum compatibility. The external browser must be configured in full screen. This option allows you to host an authentication to access a secure web page.
To use another web browser you have to edit this line in the kiosk configuration file (/home/linutop or pi/.config/linutop/preferences)
"external_browser_cmd=chromium-browser --kiosk %u"
-kiosk triggers the kiosk option of the chromium browser (full screen)
%u passes the URL to the chromium browser
Other options
- Refresh (minutes)
timming between two playlist update on Linutop TV
- Shuffle
Plays items in random order.
- Default display time
Delay (in seconds) to use as default time for added items the static playlist.
Local remote control
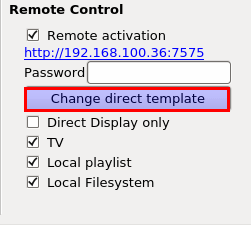
This feature allows the user to directly interact with the playlist. It can also be used to display a message with the direct display feature.
Activation of the Local remote control:
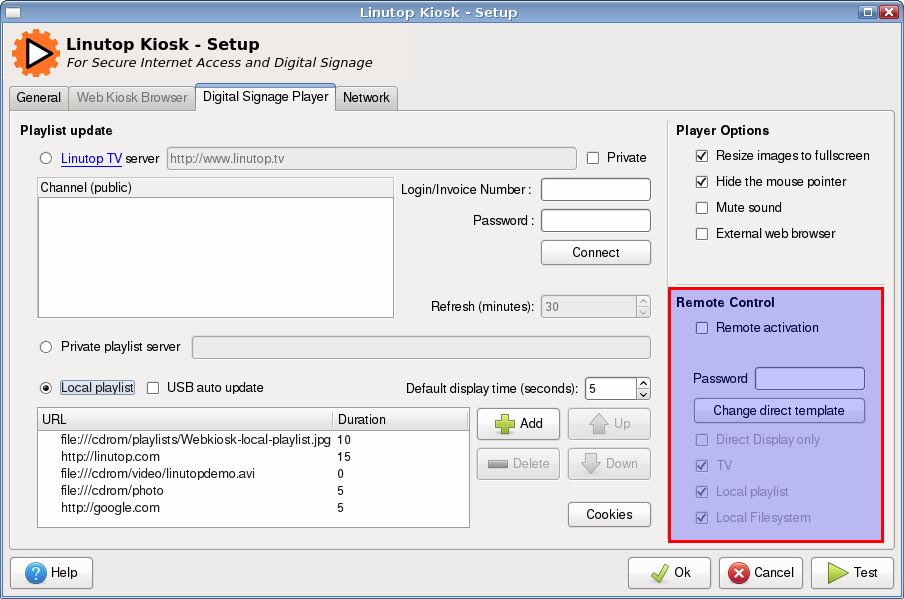
To enable the remote, remote activation has to be checkedm then to start the remote, the Linutop-kiosk player must be running.
Connection to the local remote control:
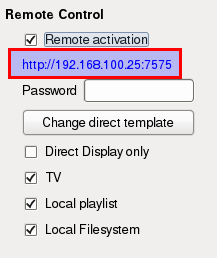

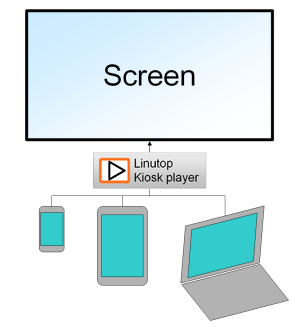
Once started, the remote is a web page accessible from any devices, such as smartphone, tablet, PC's web browser connected on the same network.
The remote web address can be seen in blue below the remote activation checkbox. Just copy the URL web dress in any browser to display it.
Note: The remote is available only when the linutop-kiosk software is running
It can also be directly displayed on the same screen as the player by clicking on the right mouse button.
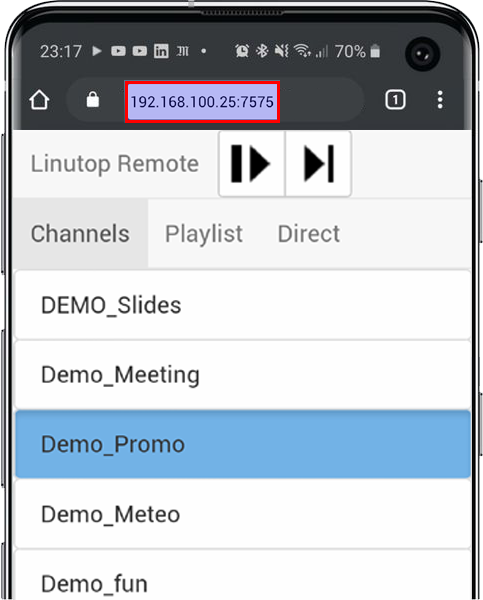
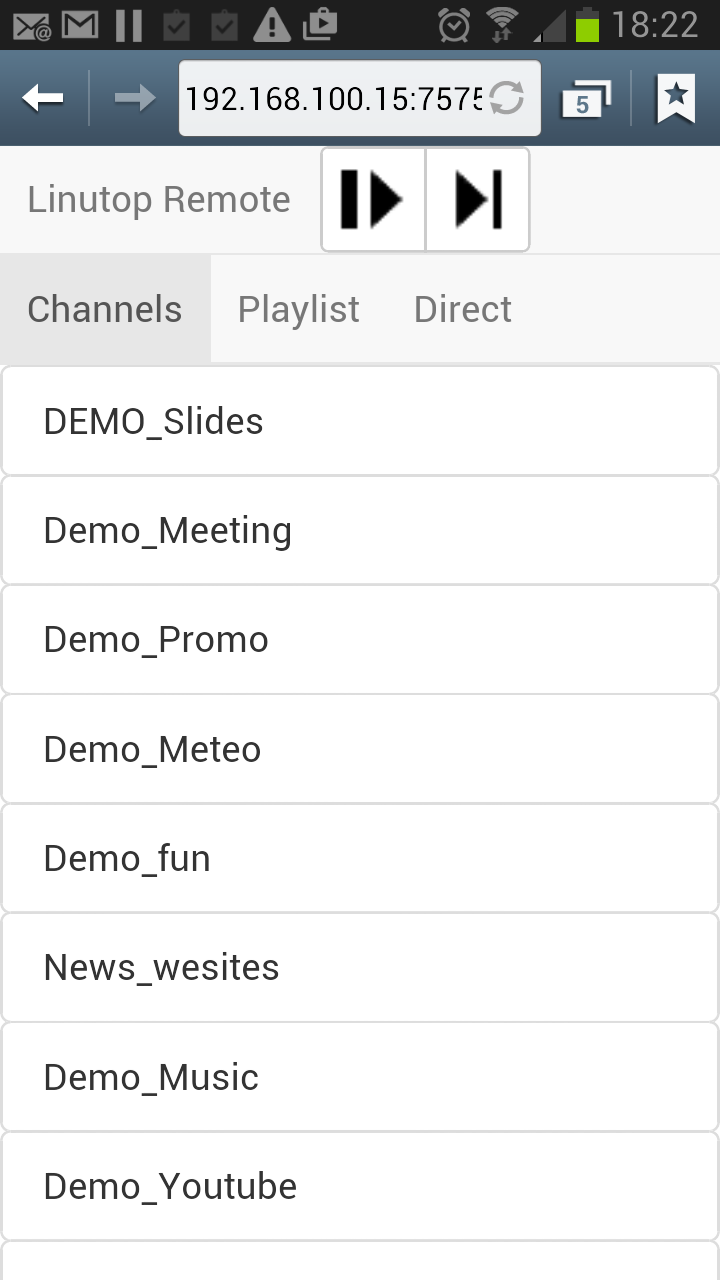
Using Linutop remote control :
|
Channels management
|
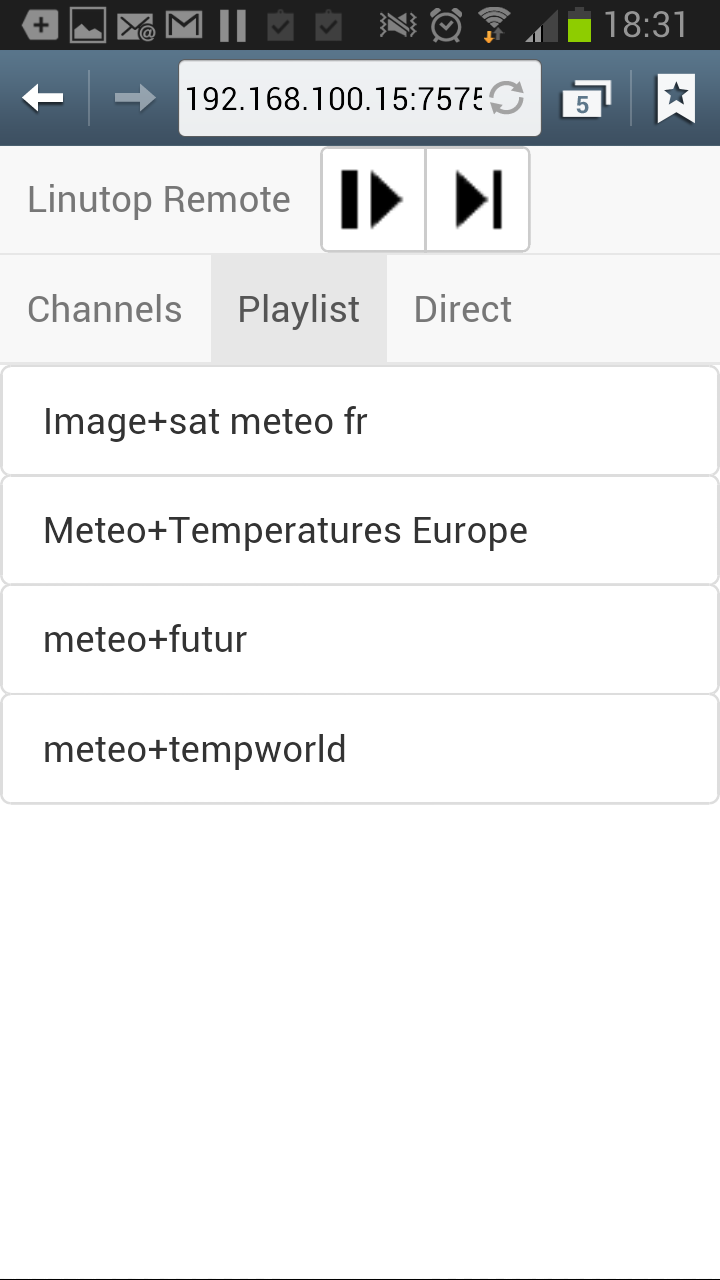
Playlist management
|
|
You can directly select a channel in order to display it, the player may need some time to upload all the data before displaying it depending of your network speed. |
The playlist view allows to select directly one playlist item. |
Direct display mode withe the remote control:
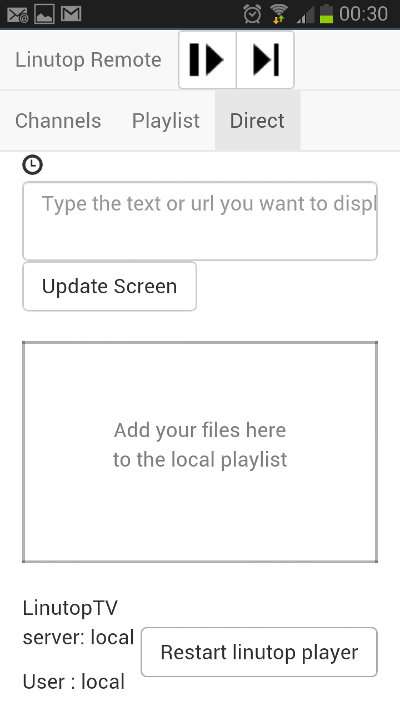
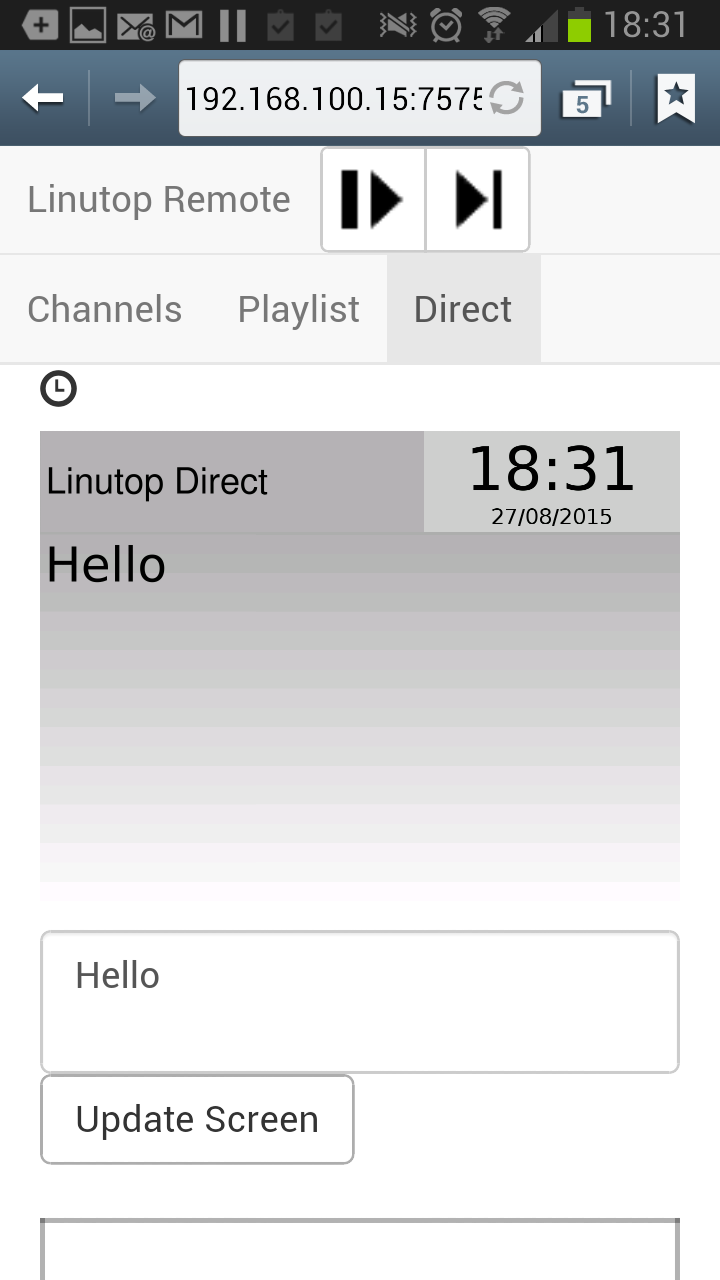
Direct display allows to send a text message on the screen, it also returns a copy of the screen.
You can also directly display an item using the drag and drop menu below
The direct display template can be customized using the button in the Linutop kiosk settings menu.
Direct template
|
|
You also have the option to change templates. By clicking on the button "change the template", you can select your template, then you must validate your selection. To display a message from the remote control, it should be explained in the template by the class "editable-block" and the variable "id = text". |
Direct template example
|
|
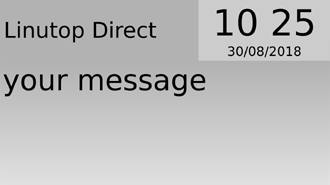
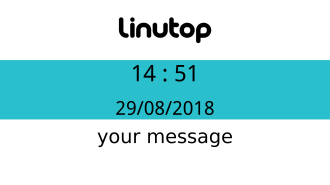
By default, the template will be displayed. The "Direct template" allows you to have an editable graphic template with insertion of a live text. |
|
|
This template allows you to display a graphic logo, the time, the date of the day and your message for a lobby. |

Sample Template

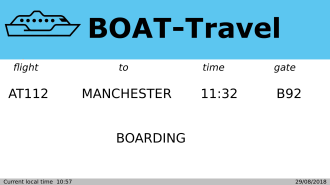
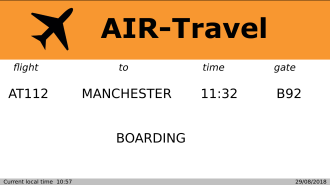
Template: for a bus station, a pier and a small airfield. It can display a message via a web browser from a phone or tablet on the local network.
Note: The background image of these templates is available by clicking on the icons. It is composed of an image of 1920x1080 able to accommodate any images and include the modifiable text.
You can also create your own template to suit your preferences. This is a simple HTML file, it is very easy to edit.
For this, you just need to edit this template by keeping this lines, to be able to display the direct text.
<span id="text" style="font-size:5.7em"></span></span>
Chapter 4. Digital Signage with Linutop TV
![]()
Configuration of your display system is done in 3 steps:
Upload your files on Linutop TV. With the Linutop TV library interface you can upload your files (videos, images or URLs).
Create your display playlist. Organize your files and set up their display parameters.
Display your playlist. Connect your display screens to your Linutop TV account.

Linutop.tv can be accessed from any PC or web browser.
Linutop.tv is also available as a Private server, for more informations: www.linutop.tv
Chapter 5. Network settings
Proxy settings
The tab of the setup interface lets you define which proxy to use.

User name and password entries can be left blank if your proxy doesn't require authentication.
The URI can take two forms:
- http://192.168.1.2:3128: simple URL, with port
- pac+http://192.168.1.3/proxy.pac: URI of a autoconfiguration script
Linutop Kiosk Network configuration
Can display on several screens on the same network from linutop.TV broacast management server. on a local network or via Internet.
Chapter 6. FAQ & Advanced configurations
FAQ
The Screen is black or in sleep mode troubleshooting checklist:
- The screen shows "Nothing to display", your playlist is empty or the file cannot be reached..
- Press 'ESC' key or CTRL+Q or Double click on mouse wheel: if the screen is back on the playlist was in sleep mode.
- Check if the screen is powered and if the right input is selected (ex: HDMI1 HDMI2...)
- Check the HDMI Cable, is it properly plugged, if is it damaged, if is it too long?
- Check if the Media Video or Image is too big or if the resolution is too high for the player, or its format is not compatible, 720p video is a good test.
- Check the player clock/time, the sleep mode might be on at night, if the time is off check the NTP protocol accessibility on the network to automatically synchronnize the clock on the Internet.
Can Linutop Kiosk play HD video?
- Yes Linutop Kiosk plays HD video depending on you hardware.
How do I quit the linutop Kiosk in full screen ?
-To quit Linutop Kiosk press 'ESC'key or CTRL+Q or Double click on mouse wheel.
Can we use Linutop Kiosk as an Audio player ?
- Yes Linutop Kiosk play any audio files.
How can I prevent the system from asking to login when exitique screen sleep?
- you need to desactivate session lock to 'never' in the security tab of the power management menu.
How the Kiosk application works
Linutop-Kiosk works in pull mode and starts to check for the latest playlist and use the local cache.
If the Network is not available it uses the last playlist and items in cache.
Storage of parameters for buster and 18.04 to the operating mode of the Kiosk:
- Configuration : /home/linutop or pi/.config/linutop/preferences
- Local: /home/linutop or pi/.linutop-kiosk/playlist
- Tv: /home/linutop or pi/.linutop-kiosk/playlist,/home/linutop or pi/.linutop-kiosk/data
- Usb: /home/linutop or pi/.linutop-kiosk/usbauto
- Remote: /usr/share/linutop-webkiosk/text.html (direct template)
Storage of parameters of 14.04 version according to the operating mode of the Kiosk:
- Common: /etc/xdg/webkiosk/preferences
- Local: /etc/xdg/webkiosk/playlist
- Tv: /home/linutop or pi/.linutop-kiosk/playlist,/home/linutop or pi/.linutop-kiosk/data
- Usb: /home/linutop or pi/.linutop-kiosk/usbauto
- Remote: /usr/share/linutop-webkiosk/text.html (direct template)
Mini-server of automatic diffusion of the media on local network
This script is used to automatically broadcast the contents of a directory on a local network in order to synchronized the media on all players. It is a light broadcast server for players. Each player is configured to display the contents of the synchronized directory.
1. Get the IP address of your other machines
The "About" tab of the control panel allows you to have more info
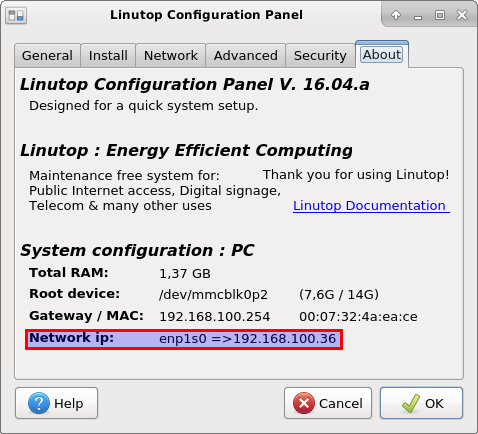
In the Network section, you can retrieve the IP address of the current machine.
2. Create the main directory containing the items to be copied
In this part, you just have to create the directory containing the files to broadcast.
3. Open and edit the script according to your preferences (all information is in comment), here is the download link of the script: auto-synchro.sh.
4. Save the script, go to the "Start Application" section of the Linutop Control Panel.
In the command to enter just type: "bash /path/to/script.sh"
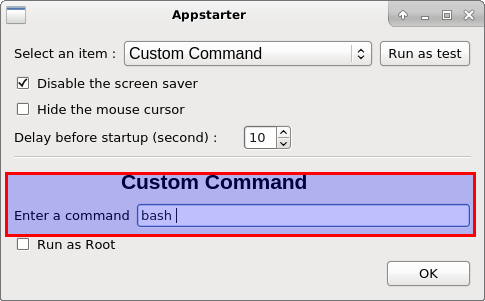
You must commit the changes and restart the system for the script to start at startup
5. Configuring the player to display the contents of the synchronized directory
Just add the directory to your local playlist

You can distribute as many documents on as many machines as you want.
External applications
The set of applications displaying specific files can be configured in the main configuration file (/home/linutop or pi/.config/linutop/preferences). The association between files and applications is done using mime types, in a [mimetypes] section.
Simple exemple of file associations:
[mimetypes]
application/pdf = evince
Type of slideshow items
When using the local playlist to define the slideshow (no XML), the application will guess the type of each item to display using the protocol and file extension. If not correctly detected, the default behaviour is to display the item as a web page. To override this behaviour, you can associate filename extensions with display types.
The known types are:
- video
- image
- document (distant item that will be cached and displayed locally)
The association is done in the main configuration file (/etc/xdg/webkiosk/preferences), in a [slideshow-types] section. For exemple:
[slideshow-types]
iso = video
flv = video
gif = image
- Hooks
Scripts can be executed when some event happen on the kiosk. For each hook a different script must be used. The scripts just need to be named like the event, and to be executable. The scripts must be saved in the hook dir (/etc/xdg/webkiosk/hooks/). The current events are: session-start: triggered when a web session starts session-stop: triggered when a web session ends
- Prestart script
In Kiosk mode, a prestart script can be used to define whether a web session should be triggered when the kiosk application starts. It can obviously also setup a few things before the application startup. The prestart script is /etc/xdg/webkiosk/prestart. It will be used if it exists and is executable. If the script returns 0, a web session will be triggered at startup. Any other return code will start the kiosk in display mode.
- Default display time
Delay (in seconds) to use as default time for added items the static playlist.
DBus interface
The browser offers a DBus interface, allowing to control a few things.
The DBus interface listens signals sent on the system bus on the object /com/linutop/WebKiosk. The messages are:
- com.linutop.WebKiosk.Signal.StopSession: stop the current web session
- com.linutop.WebKiosk.Signal.StartSession: start a new session
- com.linutop.WebKiosk.Signal.AddTime (uint32 s): add s secondes to the timer
- com.linutop.WebKiosk.Signal.uit: stop the application
dbus-send can be used to send the signals:
# stop the current session
dbus-send --system /com/linutop/WebKiosk com.linutop.WebKiosk.Signal.StopSession

# add 2 minutes to the timer
dbus-send --system /com/linutop/WebKiosk com.linutop.WebKiosk.Signal.AddTime uint32:120
Scheduler (Advanced use)
The Linutop Kiosk can use an XML file to define multiple playlists, managed by a scheduler. It is possible to manually create these files.
Loops
The scheduler uses loop blocks to define the various
playlists. Each loop must have an id attribute
(0 being reserved for the default playlist). A single loop
will contain the list of the items to displays:
<schedule>
  <loop id="0">
    <item uri="http://www.google.com" time="10" />
    <item uri="http://my_server/display/an_image.png" type="image" time="5" />
    <item uri="http://my_server/display/a_video.avi" type="video" />
    <item uri="http://my_server/display/an_image_as_web_page" time="5" />
    <item uri="http://my_server/display/a_video_as_web_page" />
  </loop>
</schedule>
The previous example shows the definition of a basic playlist. The <schedule> and <loop> nodes are mandatory. The "id" attribute is also mandatory.
Each item must define an uri" attribute which indicates where
the item can be found. It can use several schemes, depending on the type attribute:
- http://www.google.com
will show a web page (the
typeattribute must be omitted)- http://my_server/display/an_image.png
- if the
typeattribute is present, the webkiosk will download the file, and display it as a local file (the file is cached, and redownloaded only if needed). - if the
typeattribute is missing, the uri will be used as if it were a web page (no cache).
The two supported types are image and video.
for URLs and images a
timeattribute must be defined. It stores the number of seconds that the item should be displayed. For videos, the next item will be displayed when the video has ended.- if the
http://for HTTP access (web server)ftp://for FTP accessfile://for file access
Authentication is supported. For example, using a FTP authentication in a URI would give:
uri="ftp://username:passwd@server/myfile"
Date and time
Several loops can be defined. Each loop must have a uniq ID, and must define a time period. The loop ID'ed 0 will be the default loop, used if other loops don't match the current date/time.
Here are some examples of loops describing the schedule options:
<schedule>
  <loop id="0">
    <!-- default playlist defined here -->
  </loop>

  <loop id="1" start="14:00" end="18:15">
    <!-- this playlist will be read every day between 14:00 and 18:15 -->
  </loop>

  <loop id="2" start="14:00" end="18:15" weekdays="0246">
    <!--  this playlist will be read every monday, wednesday,
          friday and sunday between 14:00 and 18:15 -->
  </loop>

  <loop id="3" start="2011/03/25 00:00">
    <!-- this playlist will be used starting on march the 25th of 2011 -->
  </loop>

  <loop id="4" start="20:00" end="06:00" idle="1">
    <!-- this playlist is marked as idle. This will shut down the screen of the client -->
  </loop>
</schedule>
Combinations of these examples can be used.
A demo playlist is available at http://display.linutop.com/demos/linutop.xml.
Adding a font to the system
Additionnal fonts can be necessary to display some web pages or documents.
It is possible to add new fonts to the system using a font file (fontname.ttf), to do so you need to create a folder with the name of the font in lower case in /usr/share/font then copy the fontname.ttf file into the folder. There is two way to do so, using thunar as root :
$ sudo thunarOr doing it with in command line (open the terminal in the folder containing the .ttf file):
$ sudo mkdir /usr/share/font/fontname
$ sudo cp fontfile.ttf /usr/share/font/fontname/fontname.ttf
Prevent thunar network access
By default thunar can access your network. to secure/prevent this network access, use the command below.
$ sudo chmod 000 /usr/share/gvfs/mounts/network.mountAnd if you want to put it back:
$ sudo chmod 644 /usr/share/gvfs/mounts/network.mountYou need to restart your computer in order to apply the change.
Chapter 7. Quick configurations - Tutorials
How to configure a Secure Internet kiosk
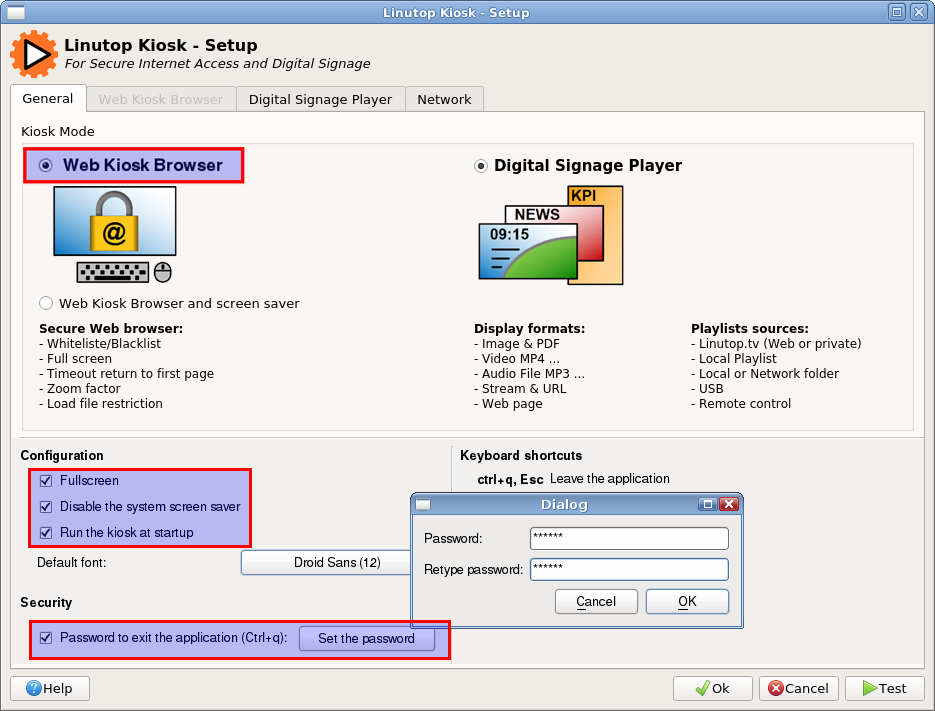
This section explain how to setup a secure kiosk.
First you need to select Web Kiosk in the main panel and to check fullscreen and use a password (don't forget to set the password).
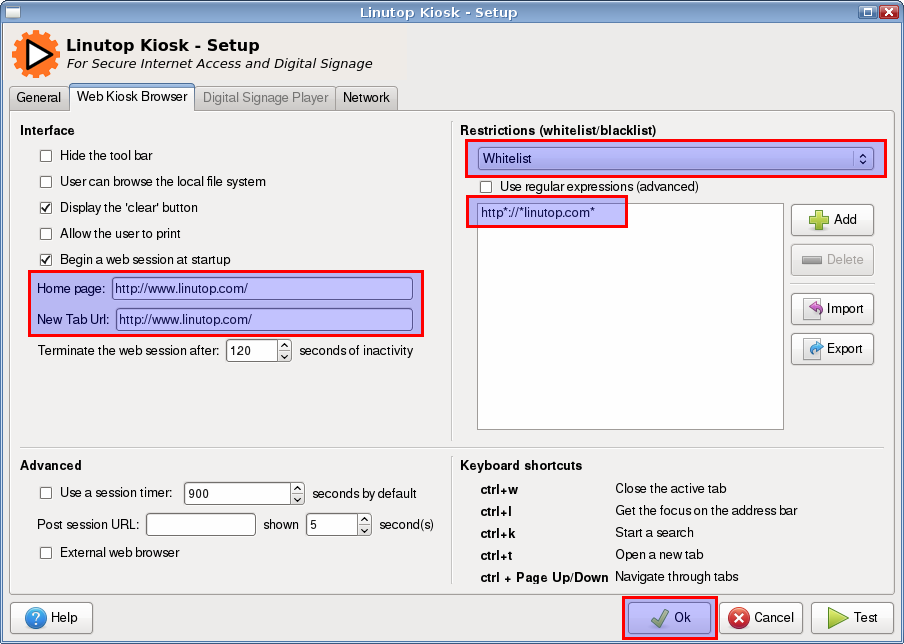
Then in the Web Kiosk tab you can choose which website will be displayed as home and in each new tab. Also you can blacklist or whitelist website using the restriction panel. Once done hit the OK button to validate the configuration.
Once secured to quit the kiosk application hit Ctrl+q and enter your password.
How to display a web page on a digital signage screen
This section explains how to display a web page. It can be a local web page, Internet or intranet.
This can automatically display:
- A dashboard (KPI)
- A clock for a home screen
- A dynamic screen template in javascript (template)
- The pages of a website with a zoom
- A web page with automatic scrolling
Select Dynamic Display Player to automatically run at startup and check "Run kiosk on startup

Then, in the Dynamic View Player tab, you must use the Add button to open a dialog box that allows you to choose which webpage to display and its display time, a time of 0 means it will be posted forever.

Once you have clicked the "web page" button, the browser (chromium or firefox will open), allowing you to access the desired page and copy its address in "Location URI" then validate
|
You can also activate the auto scrolling option so that a web page can be read in its entirety. A zoom factor adjusts the text size for playback via the "Kiosk Web Browser" tab |
Linutop Kiosk is available in the Menu |
A local address can also be inserted "http://192.168.200.48/production/l1"
The default browser is the kiosk (based on WebKit, faster but can have a different rendering), it is possible to select an external browser by checking the option and allow the opening of Chromium, Firefox or other allowing accommodate the latest standards and strong authentication.
Display a network shared folder content
This configuration simply displays the contents of a shared folder containing photos, video, pdf on a screen.
In order to display the contain of a shared folder on a local network with or without password.
You must :
|
1- Access your shared directory with Thunar File Manager.(Acessories Menu)
|
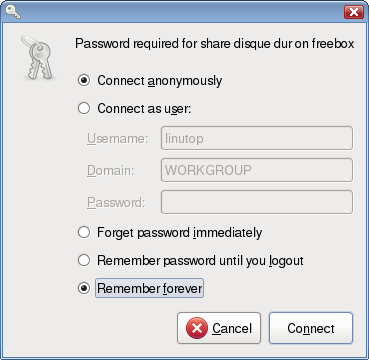
2- Enter authentication to access the shared directory.
|
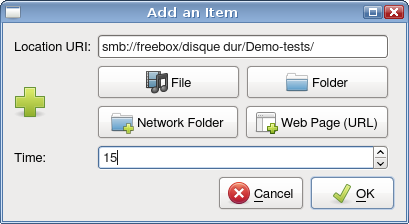
3- Open a dialog by pressing the Add button of the "Dynamic Display Player" interface.
4- Copy the path and insert it in the "Location URI" dialog box.
In case you want to add a password you have to go to "Browse the network", choose the network and then choose the option "Remember forever".
| Caution |
The "Test" button is not functional when you insert a shared directory. |
How to connect Linutop-Kiosk to Linutop TV
This section explain how to use the Linutop TV service.
First you need to select Media Player in the main panel and if you want it to start automaticaly check the associated parameter.
How to configure Linutop TV service
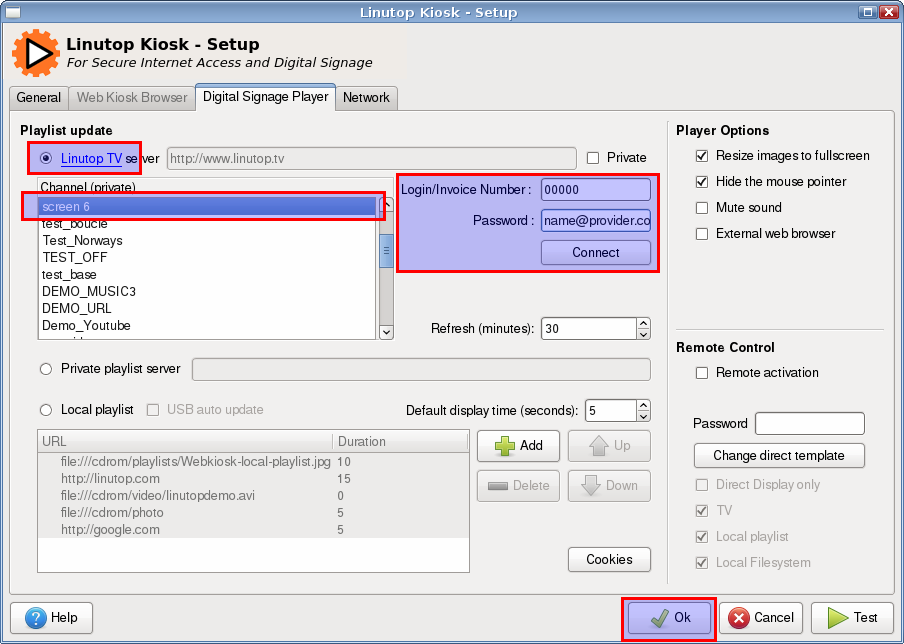
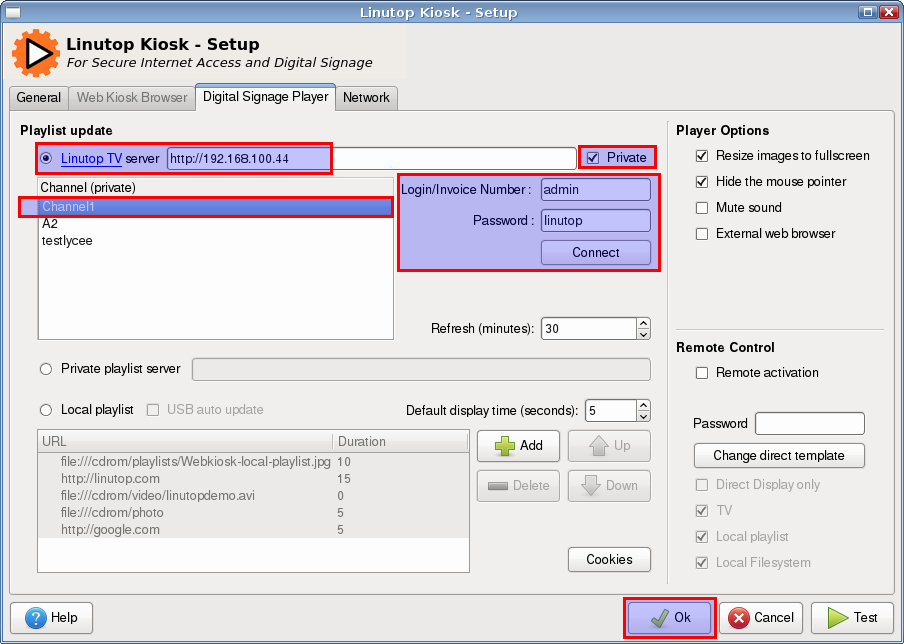
If you use a public server you need to select and to log with your invoice number and you password. Then choose the playlist you want to display and hit the button.
To quit the kiosk application hit Esc. If a password is set, use Ctrl+q and enter your password instead.
Linutop TV private server configuration
If you use a private server you need to select and to check then enter the url or ip address of your server. once done you need to use your login and password to access the playlist (by default admin/linutop). Then choose the playlist you want to display and hit the button.
To quit the kiosk application hit Esc. If a password is set, use Ctrl+q and enter your password instead.
Linutop TV private server configuration in the player
can be install in the player in order to manage one screen digital signage from the local network If you use a private server you need to select and to check then enter the url . once done you need to use your login and password to access the playlist (by default admin/linutop). Then choose the playlist you want to display and hit the button.
To quit the kiosk application hit Esc. If a password is set, use Ctrl+q and enter your password instead.