Linutop OS Documentation
Copyright © 2024 Linutop SAS
|
|
Linutop OS is a lightweight Linux based Operating System, designed to configure a Kiosk or a Digital Signage Player. Available for PC or Raspberry Pi. More about Linutop OS. |

- Table of Contents
- 1. About Linutop OS
- 2. Download and Install the Linutop OS Free
- 3. Linutop OS Pro version Installation
- 4. Linutop Configuration Panel
- 5. Use your Linutop System
- 6. Linutop OS security for lockdown kiosk
- 7. Hardware
- 8. FAQ
- 9. Tutorials & tips
Chapter 1. About Linutop OS
Introduction
Linutop Operating System is designed to minimise cost and maintenance by offering stability, privacy and efficiency, using standard and documented Linux systems:
- PC Version is based on XUBUNTU (UBUNTU With XFCE Desktop classic graphic environment)
- Raspberry Pi Version is based on Raspberry Pi OS (With XFCE Desktop classic graphic environment)
Linutop specific applications:
- Linutop Kiosk (player and setup)(Kiosk for secure web browsing and/or Digital Signage player)
- Lintutop configuration pannel (Configuration menu for a quick OS setup)
- Lintutop asrun (autolauncher for autostarted application)
Linutop OS is a maintenance free system for:
- Public Internet access (secure kiosk for Internet or local website browsing)
- Digital signage, DOOH (media player for full screen web page display, image, video, PDF, kiosk for Internet or audio player)
- Telecom
- and many other uses
Linutop OS is small and can also be run on smaller configuration with less RAM allowing recycling of older PCs or raspberry Pi in order to extend their life cycle minimizing waste.
Energy Efficient Computing - Sustainable development - Green IT
Hardware requirements
Linutop OS for PC
Minimum hardware requirement for Linutop OS:
- x86 processor (Intel, AMD), at least Pentium III (500Mhz)
- 512MB of RAM (1GB recommended)
- Any type of bootable storage (USB hard drive or key, IDE or SCSI drive, SSD). Your BIOS should also be able to boot the desired hardware (configuration is hardware dependant).
- At least 1GB of disk space for 32bits Version and 16GB for 64bits
The system is based on Ubuntu 18.04, and has the same hardware compatibility. To make sure your hardware is compatible, download and run the Linutop OS Free.
Linutop OS for XS (Raspberry Pi)
Minimum hardware requirement for Linutop OS XS:
- Raspberry Pi 4, 400, 3, A et A+, 2, B+, B & Zero
- At least 8GB of SD card space
The system is based on Raspberry Pi OS (Buster), and has the same hardware compatibility. To make sure your hardware is compatible, download and run the Linutop OS XS Free Free.
Get the OS
Linutop OS Pro is already pre-installed on Linutop machine.
Linutop OS Pro can be purchased on USB Key, SD Card or a download on Linutop shop.
Linutop OS Free can be downloaded for free. The Free Version has no limitation, only Linutop Kiosk and linutop Configuration Menu are in demo version most features can be used. (the full version (pro) is available in the Linutop shop) and can be installed. This can be done from the Free system, following the installation documentation.
Chapter 2. Download and Install the Linutop OS Free
|
|
The Free system is provided under three forms:
|
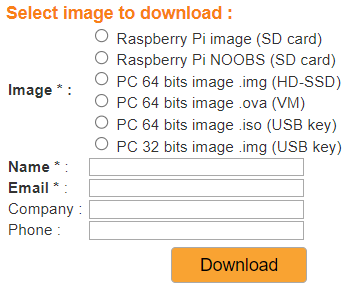
Linutop OS Free can be downloaded on Linutop.com download page.
How to install Linutop OS Free on a Raspberry Pi
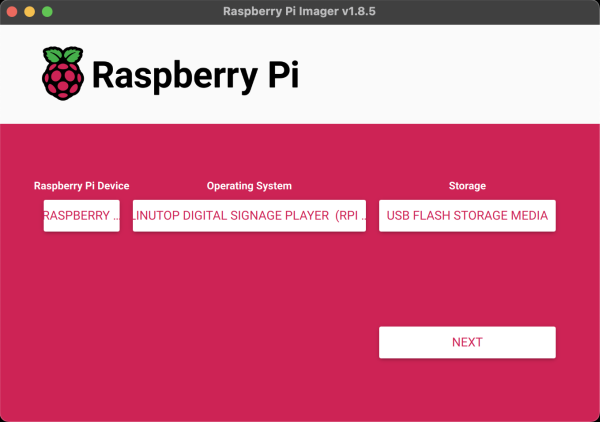
- Quick installation with Raspberry Pi Imager software and a micro SD card:
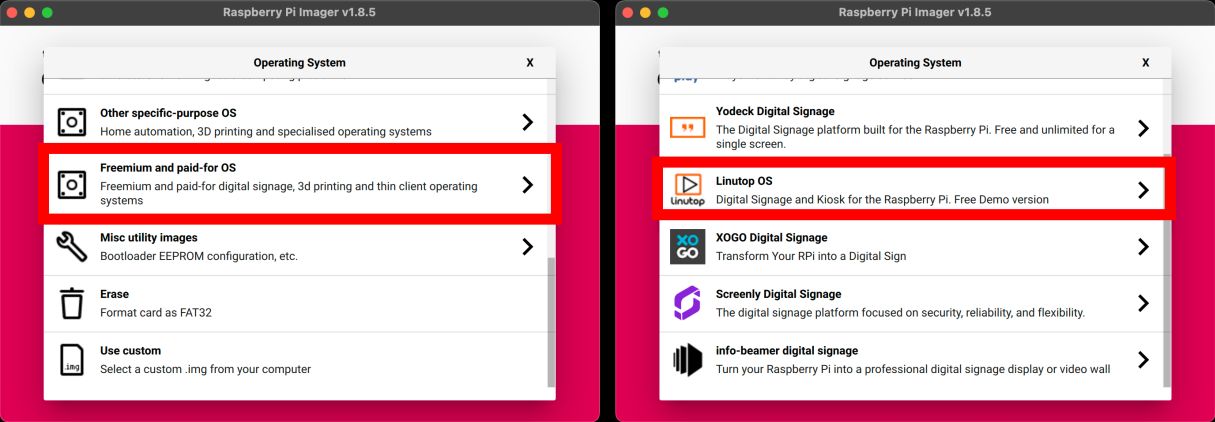
Download and install Raspberry Pi Imager (Available for Windows/MacOS/Linux), then select: : Choose your model (4, 3, 2 ou Zero 2W). : Freemium and paid-for OS → Digital signage OS → Linutop OS → Linutop Digital Signage Player.
Connect your micro SD, click , Validate with , wait for the end of the installation, then disconnect the micro SD card and insert it in your Raspberry Pi.
- Installation with Imager balenaEtcher software and the .img image file:
The image of Linutop OS Free is available on our site at the following address: Linutop.com . You will need a virgin micro SD.
Download balenaEtcher , available on Windows, MacOS and Linux. Install the software, insert your micro SD card, then diszipulate the file you downloaded from the site Linutop.com .
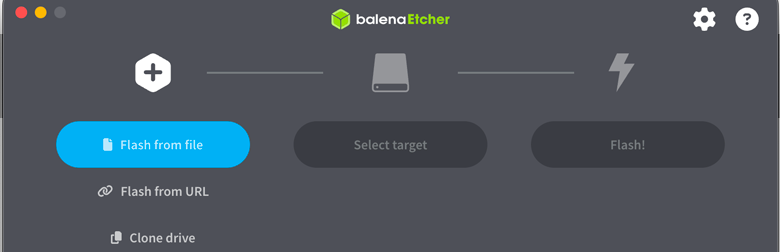


In balenaEtcher, select the image file , choose the device of your micro SD card, then click . Once the writing is finished, disconnect the micro SD card and insert it in your Raspberry Pi to start with Linutop OS Free.
- NOOBS image installation:
Noobs image files must simply be copied to the micro SD card formatted in FAT32. Under Windows™, MacOS or Linux.
After copy, you can remove the micro SD card and insert it in your Raspberry Pi to start installing Linutop OS Free.How to install Linutop OS Free on a PC
- Installation with Imager balenaEtcher software and the .img or .iso image file:
The image of Linutop OS Free is available on our site at the following address: Linutop.com . You will need external storage (USB key, hard drive or a blank SD card).
Download balenaEtcher , available on Windows, MacOS and Linux. Install the software, insert your external storage, then diszipulate the file you downloaded from our Linutop site.
In balenaEtcher, select the image file , choose your external storage device, then click . Once the writing is finished, disconnect the storage and insert it into your Raspberry Pi to start with Linutop OS Free.
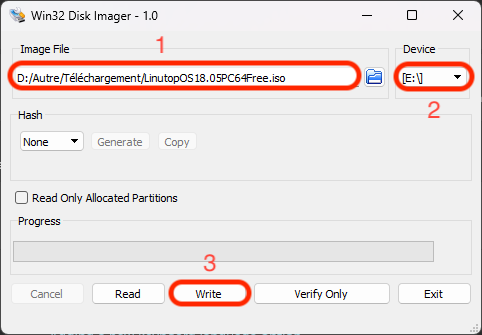
- Installation from Disk Imager with an image in .MG or .iso (Windows):
The USB or SD image must be written on a USB device or SD card.
Under Windows™, download Disk Imager , decompress and to run the software. Connect a USB key or SD card (1 GB min), select it And select the Linutop .img file. Click on the button .
- Installation from a virtual machine with an image in .ova or .iso:
Example of installation of the OS in a virtual machine (VM): Installation guide for a private Linutop TV server in a virtual machine
- How to configure the bios to boot Linutop OS:
To access the BIOS, the key is generally on .
In the BIOS, select to boot.
For more detail, consult the documentation of Ubuntu
Alternative Installation Method for PC or Raspberry Pi
The USB or SD image must be written to an external storage device (USB key, hard drive, or a blank SD card).
- On Linux:
On Linux systems, all the following commands must be executed as an administrator. Unzip the OS image and navigate to its directory. Then, to determine the name of the USB key or SD card, you can use the command `lsblk`:
# lsblkHere is an example of what this command might return:
NAME   MAJ:MIN RM   SIZE RO TYPE MOUNTPOINT
sda      8:0    0  74.5G  0 disk
-sda1   8:1    0  74.5G  0 part /initrd/cdrom
sdb      8:16   1  14.5G  0 disk
-sdb1   8:17   1    60M  0 part /media/linutop/boot
-sdb2   8:18   1    3.5G  0 part /media/linutop/e6e7f776-11a4-4cd7-b4fd-c44ecdbf
loop0    7:0    0 816.8M  0 loop /initrd/rofs
Once this is done, type the following command to transfer the file to the storage location:
# sudo dd if=linutop-demo-latest.img of=/dev/sd
| Caution |
Replace X with the number returned by your terminal when running the lsblk command. |
- On macOS:
On macOS, all the following commands must be executed as an administrator. Unzip the OS image and navigate to its directory. Then, to determine the name of the USB key or SD card, you can use the following command in the terminal:
# diskutil listHere is an example of what this command might return:
/dev/disk0 (internal, physical):
#:                       TYPE NAME                    SIZE       IDENTIFIER
0:      GUID_partition_scheme                        *500.3 GB   disk0
1:                        EFI EFI                     209.7 MB   disk0s1
2:                  Apple_APFS Container disk1       500.1 GB   disk0s2

/dev/disk2 (external, physical):
#:                       TYPE NAME                    SIZE       IDENTIFIER
0:     FDisk_partition_scheme                        *16.0 GB    disk2
1:                 DOS_FAT_32 UNTITLED               16.0 GB    disk2s1
Once this is done, type the following command to transfer the file to the storage location:
# sudo dd if=linutop-demo-latest.img of=/dev/rdiskX bs=1m
| Caution |
Replace X with the number returned by your terminal when running the diskutil list command. |
Chapter 3. Linutop OS Pro version Installation
System Installation
The installation of a new Linutop OS needs to be done from a running Linutop system. This can be:
- a system installed on a Linutop machine
- the Linutop demo CD or USB system
You need to be connected to Internet in order to perform the installation.
In the Linutop Configuration Panel, select the Services tab, and login with your linutop.com email address and invoice number:
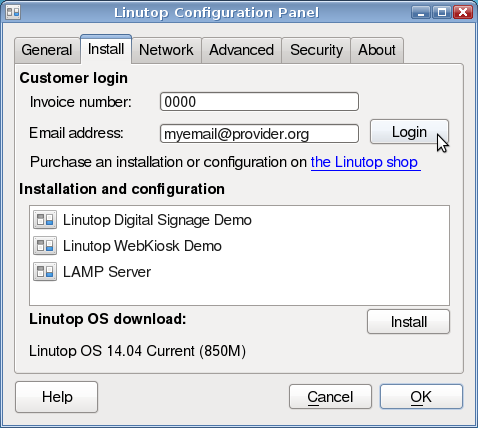
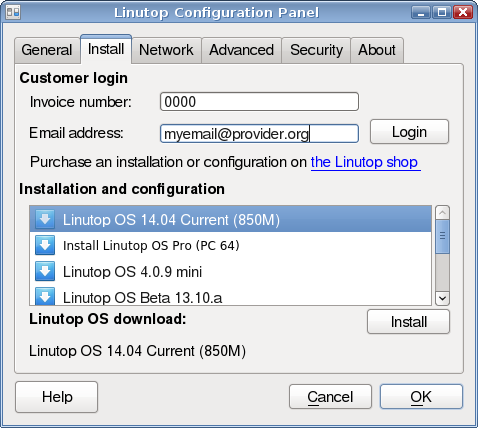
When logged in, a list of available OS and configurations will be available. Select the system you want to install. If you don't know which one to select, choose the first one marked as Current:
| Caution |
The target device will be ENTIRELY ERASED, deleting all the data on it if you proceed to the next step. |
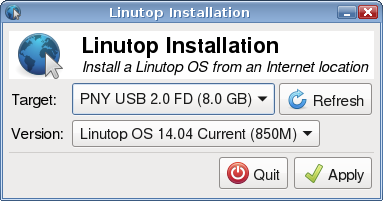
The device can be used to boot on the same machine, or an other one.
Chapter 4. Linutop Configuration Panel
Overview
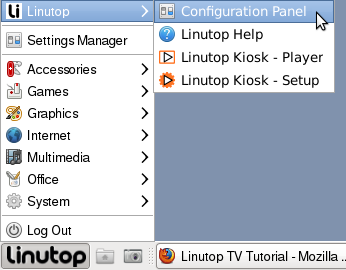
When booting the Linutop OS for the first time, the Linutop Configuration Panel will be started on the desktop. This application lets you configure the essential features of the Linutop OS.
To start the Linutop Configuration Panel later, use the item from the menu:
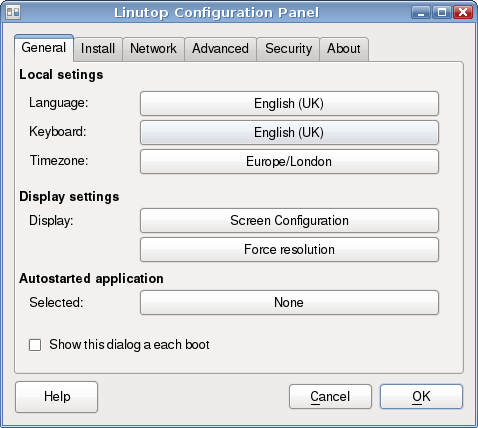
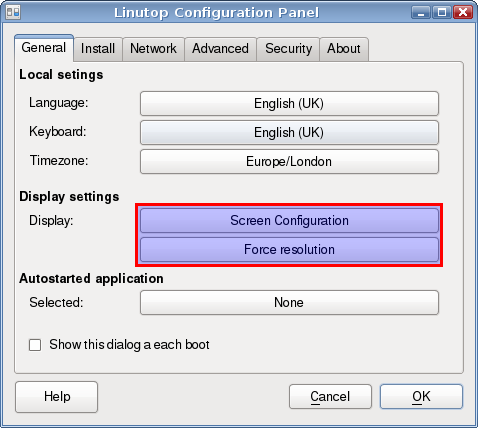
General tab Local settings Language - Keyboard - Time - graphic configuration and Autostart
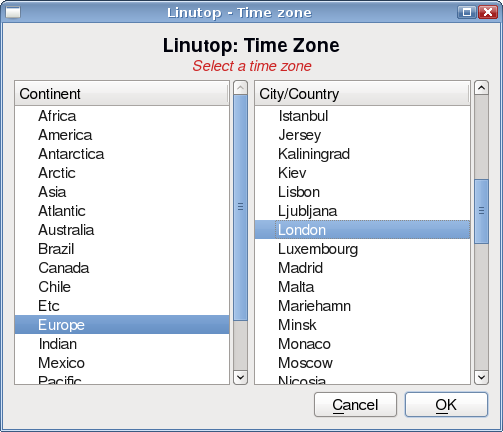
The first tab of the Linutop Configuration Panel will let you configure your local settings:
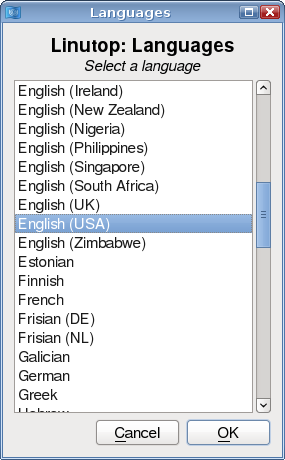
- language
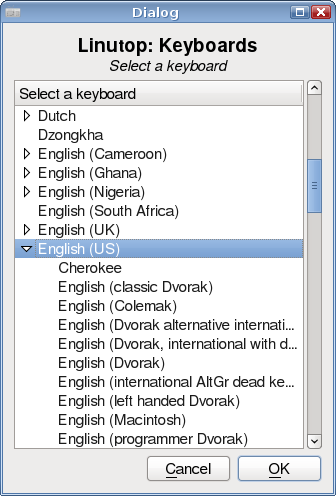
- keyboard layout
- timezone
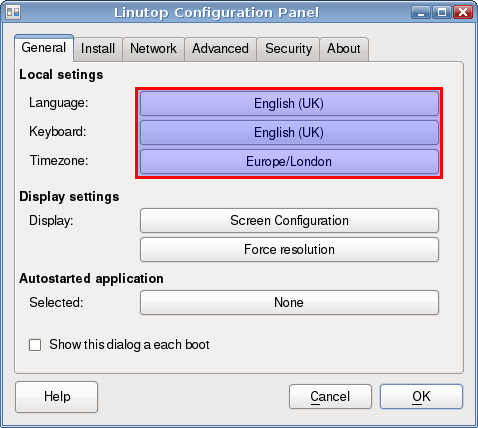
Clicking on each button will start a new dialog, allowing the make your choice.
Note: Modifying the language first will update the keyboard layout and timezone as well.
Time and Date are automatically synchronized by a NTP Server on the Internet. If the system is offline, it will use the local battery backup internal clock. On Raspberry Pi there is no internal backup clock, it has to be synchronized on the network with an Internet NTP server or a local NTP Server or manually.
To manually setup the clock you can use the Date command line in a terminal.
sudo date --set "14 Feb 2021 18:30:00"
Display settings
On Linutop OS for PC
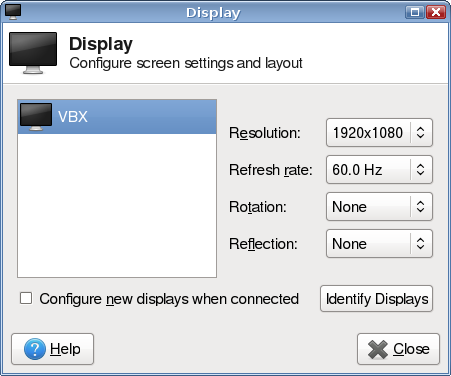
By default the Linutop OS will detect the screen resolution automatically.
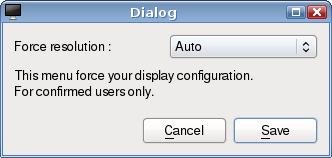
If you need to set a specific resolution, click the button. A new dialog will open, allowing to select a resolution.
On Linutop OS XS (Raspberry Pi)
|
|
Available resolutions :
|
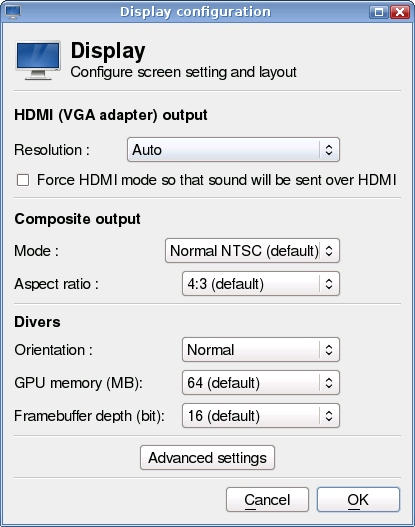
Linutop display configuration menu has been designed specifically for Raspberry Pi with most important graphics settings features in one menu.
Note: Some resolutions or videos might require more GPU memory to work properly.
Since the Raspberry Pi 4 has two video outputs, it is possible to display on two screens. You can configure this when you press start.
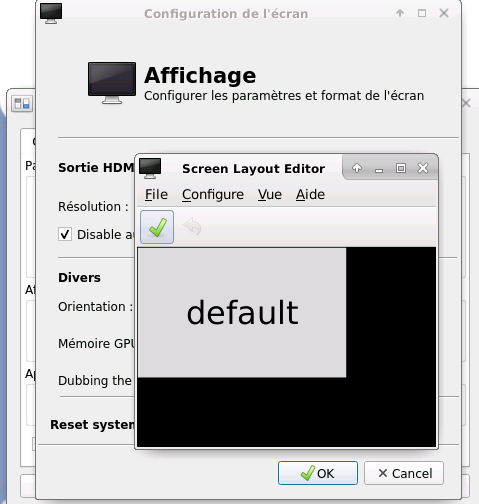
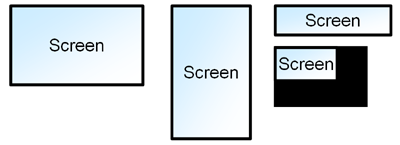
Linutop advance display settings menu has been designed to accommodate many custom settings on Raspberry Pi.
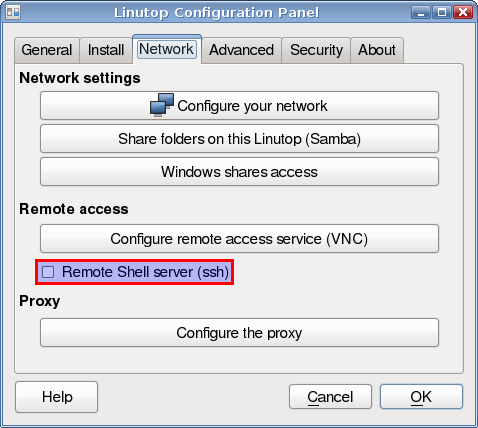
Network settings
Connect to the local network and WIFI
The Linutop OS uses Network Manager to handle connections to the local network. This tool can be accessed in the notification zone of the panel, on the bottom right corner of the screen:

A right click on the icon will let you configure the connection.
A left click on the icon will show a list of available devices. If you have WiFi hardware, discovered networks will appear. Click on the one you want to use, and the connection will be enabled. If needed, a passphrase will be prompted.
How to configure a VNC remote access
Configure the remote access
The Linutop OS can be accessed remotely if it is connected to a network. The remote access is disabled by default. To enable it, open the Linutop Configuration Panel, go to the tab, and click the button.
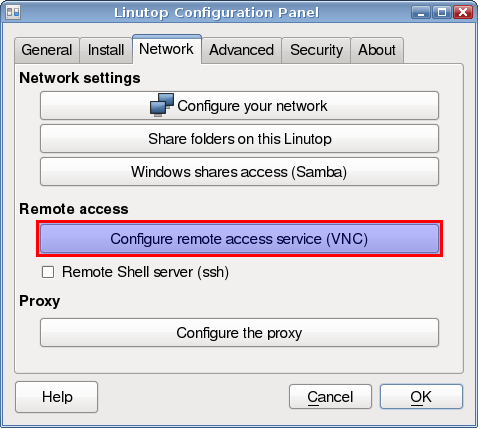
A new dialog will appear, in which you'll be able to setup a few things:
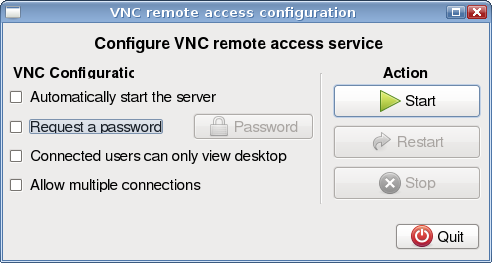
The buttons on the right column will let you manage the remote access service without rebooting the system.
Click on the button when you are done.
Access the Linutop OS
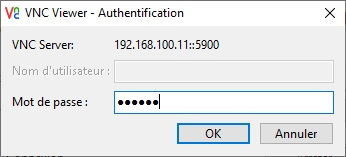
The remote access uses the VNC protocol.
You will need two things to access the Linutop OS:
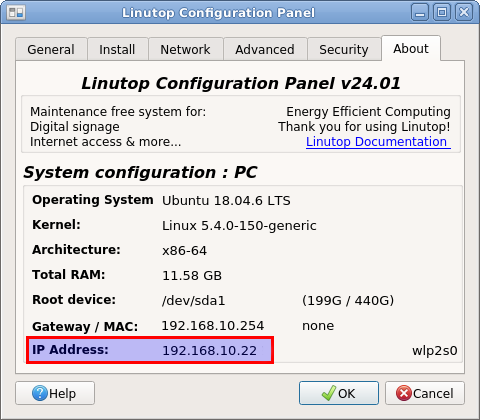
- the Linutop OS IP address
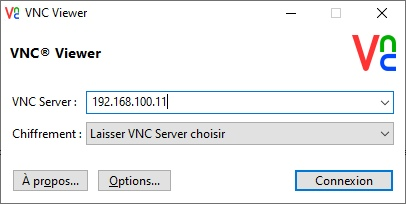
- a VNC viewer
The Linutop OS IP address is available in the tab of the Linutop Configuration Panel:
A VNC client for Windows™ can be downloaded on the RealVNC website. Install the application and execute it. The IP address of the Linutop OS will be prompted in the field. Set it and click :
Sharing data
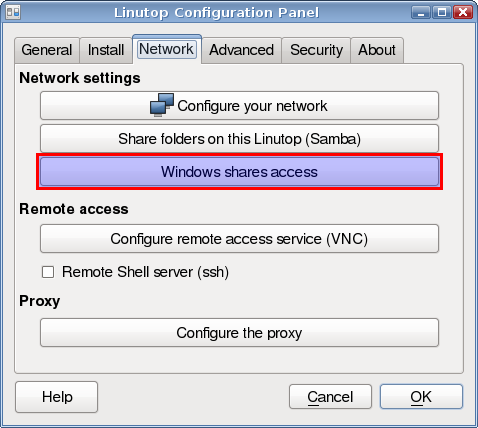
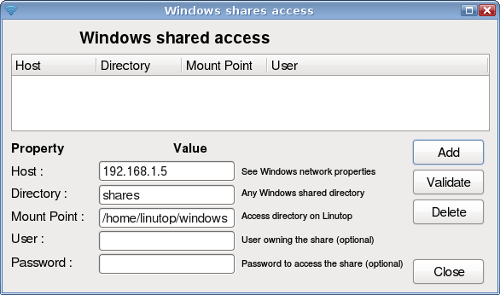
Accessing Windows™ shares
Access to Windows™ shared folders can be done in several ways.
Access to other shared data
You can install the Gigolo from the package manager to access various types of servers (FTP, SSH, WebDAV, ...).
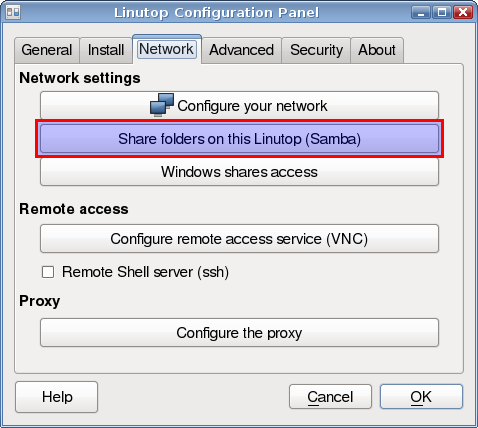
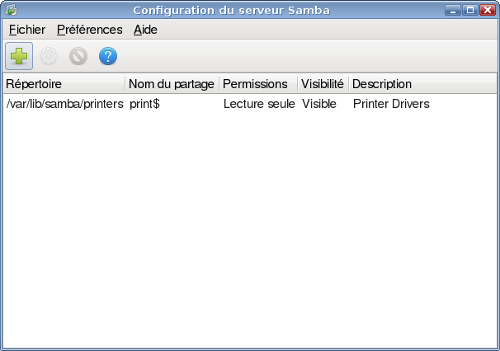
Share folders from the Linutop OS (PC only)
The Samba allows to share folders from your Linutop system. It is installed by default and you can configure it from the Linutop configuration pannel.
Connect via SSH (terminal connection)
The SSH allows to access remotely to your computer with a terminal. You can start the ssh server via the configuration panel.
Fixed IP configuration for PC
On PC Linutop OS can be configured in fixed IP with the file /etc/network/interfaces.
auto lo
iface eth0 inet static

address 192.168.1.81
netmask 255.255.255.0
gateway 192.168.1.254
Sample configuration of the file : /etc/network/interfaces
To edit the file you can use the command in a terminal:
sudo gedit /etc/network/interfaces
Fixed IP configuration for RaspberryPi
Raspberry Pi Linutop OS can also be configured in fixed IP by Wifi or Ethernet.
However, this tutorial is only compatible with Rasbian Jessie or Strech.
To edit the file, you can use this command in a terminal:
sudo gedit /etc/dhcpcd.conf
If you want to use an ethernet configuration, add this at the end of the file:
interface eth0
static ip_address=192.168.1.81/24
static routers=192.168.1.254
static domain_name_servers=192.168.1.254
For Wifi, replace the first line with:
interface wlan0
Note: domain_name_servers (DNS) can be a external adress
Then restart the system.
To check the different network interfaces:
ifconfig
Advanced settings (mostly PC)
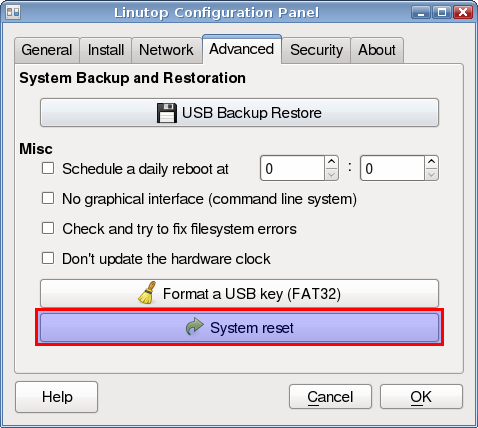
The Advanced tab of the Linutop Configuration Panel lets you configure some less used features.
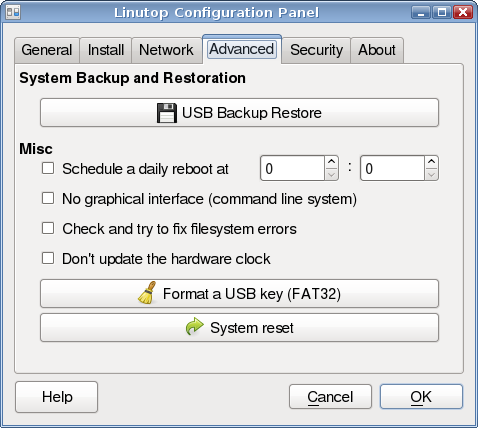
System Backup & Restore: see details.
System Reset: see details.
The Misc frame lets you configure the following features:
- Schedule a daily reboot
Restart the system every day at the configured hour. This helps cleaning the system memory, and restart in ideal conditions.
- No graphical interface
For a server use, you might want to disable the graphical interface on the Linutop.
To re-enable the graphical interface, use the startx command from the console when logged in. Uncheck this setting in the Linutop Configuration Panel to automatically restart the graphical interface during boot.
To log in, use the linutop user name. The password is blank by default.
- Check and try to fix file system errors
The system checks that the file Ssystem is in good shape when it boots. This is a safety that shouldn't be disabled, but this option lets you decide otherwise.
- Don't update the hardware clock
If enabled, the system will not change the hardware clock setting on shutdown. It is recommended to use it on a dual boot system (Windows/Linutop OS).
- Format a USB key
This option will format a USB to make it usable under Windows™.
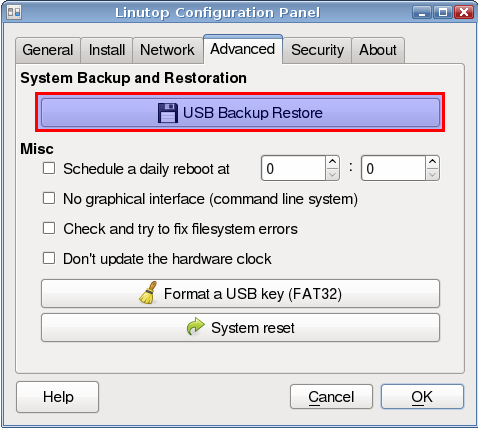
System backup and restoration (PC only)
Perform backups
It is highly recommended to backup the Linutop OS before you start tweaking it. The entire system can be duplicated on a USB key (1G minimum).
To start the backup tool, open the Linutop Configuration Panel and click in the tab:
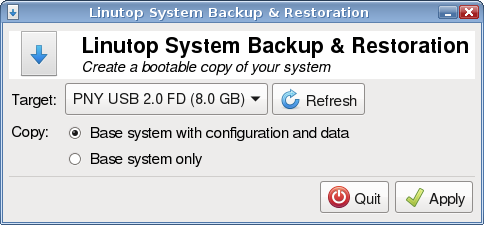
Plug in the USB device on which you want to perform the backup. If several devices are connected, choose the correct one from the Target drop box.
You can choose to backup the system only, as provided by Linutop. It is recommended to have one such backup.
The other choice is to backup the system and the modifications you've done on it (added applications, configurations...). Make sure that your data and the system can fit on the USB device.
| Caution |
The target device will be ENTIRELY ERASED, deleting all the data on it if you proceed to the next step. |
Click the . When the copy is done it is safe to remove the USB device.
Restore backups
When you do a backup, the USB key can be used to boot the system. Restoring a backup is a simple operation:
- Boot on your backup key.
- Start the Linutop Backup & Restore tool.
- Choose the internal disk as target.
- Select the copy type (system only or all data).
- Validate.
- Shut down, remove the backup key and restart.
System reset
The original Linutop OS will never be altered, even if you delete files or remove applications. To restore the system to its original configuration, follow these steps:
Run the Linutop Configuration Panel and select the Advanced tab. Click on the reset button:
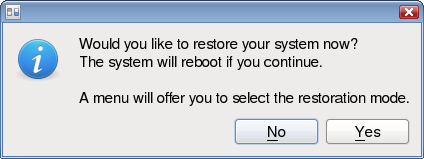
If you really want to reset your system to the original configuration, click on the button. You'll have a last chance to cancel the operation.
The system will reboot.
After the reboot, a simple menu with three choices will appear. Select what you want to do with the up and down arrow keys. Validate with the Enter key.
The three choices are:
- Cancel the restoration
Do nothing, and restart the system.
- Restore the system (keep user data and configuration)
Only the installed/suppressed software will be wiped out.
- Restore the system (delete everything)
Suppress all modifications (including data that might have been added on the system.
Caution The last two choices will DELETE various elements from the system. Make sure that's what you want to do before validating.
Chapter 5. Use your Linutop System
Available applications
The Linutop OS comes with a set of installed applications. All these applications (in fact, the entire system) are open source.
Table 5-1. Linutop OS XS for PC - Main applications
|
| Firefox | A web browser |
|
| Firefox | A web browser |
|
| LibreOffice | An office suite (word processor, spreadsheet, presentation) |
|
| Linutop-kiosk | A Kiosk Web Browser and a Digital Signage Player |
|
| Linutop Configuration Panel | An complete system configuration menu tools |
|
| VLC | A multimedia player |
|
| Mirage | An image viewer |
|
| TSClient | A thin client tool (RDP, VNC, X11) |
|
| Solitaire | A card game |
|
| Ubuntu | The Linux operating base system |
The Linutop OS XS is slightly different to accommodate the Raspberri Pi Platform.
Table 5-2. Linutop OS XS for RaspBerry Pi - Main applications
|
| Chromium | A web browser |
|
| LibreOffice | An office suite (word processor, spreadsheet, presentation) |
|
| Linutop-kiosk | A Kiosk Web Browser and a Digital Singage Player |
|
| Linutop Configuration Panel | An complete system configuration menu tools |
|
| VLC | A multimedia player |
|
| Mirage | An image viewer |
|
| Solitaire | A card game |
|
| Debian | The Linux operating base system |
These applications are integrated in a desktop environment called Xfce. It is the application handling the windows, background, icons, file manager...
Linutop applications Command line:
Linutop Kiosk (player):
linutop-kiosk
Linutop Kiosk settings:
linutop-kiosk-settings
Linutop panneau de configuration:
sudo linutop-os-settings
Linutop autostart:
asrun
Automatically start applications
Main application
This application will automatically start an application just after boot, if the application unexpectedly stops, it will be automaticaly restarted.
The automatic startup of the main application used on the Linutop can be configured in the Linutop Configuration Panel, on the tab:
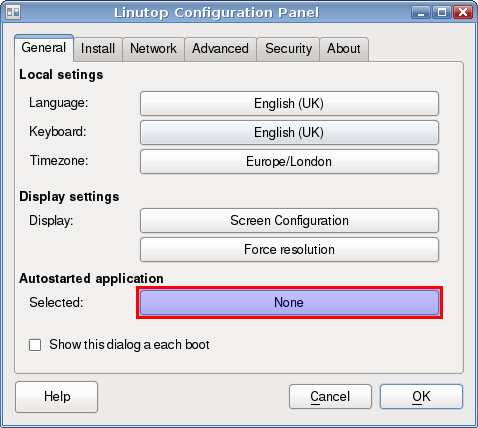
The Selected line shows which application is currently set to be started automatically. Clicking on its button will start the AppStarter application:

The drop down menu on the top on the window will let you select the application you want to start. For each application, a specific menu will be displayed on the bottom part of the window.
Two choices are common to all applications:
- Disable the screen saver
This option will forbid the screen saver to start (handy for digital signage applications).
- Hide the mouse cursor
If no mouse movement is detected, the mouse pointer will disappear after a second.
Note: The flashplayer will automatically switch to fullscreen mode after a few seconds.
To test your settings, click the button.
Validate your choice by clicking the button. The newly selected application will appear in the Linutop Configuration Panel.
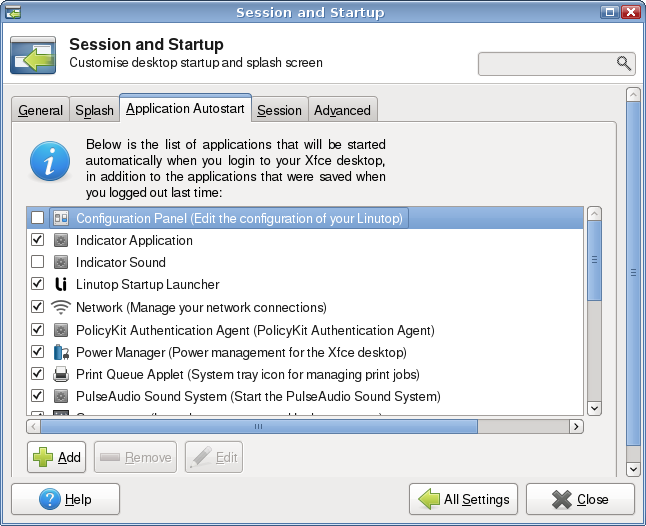
Additional applications startup
More applications can be automatically started, using the desktop session mechanism.
To set this up, select in the main menu : . In the settings menu, select the Item, then the tab.
Click the button to add a new application to autostart.
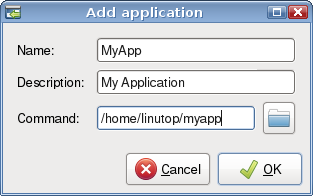
Adding Applications
Using Synaptic (PC only)
The Linutop OS is based on Ubuntu, a Linux operating system. Ubuntu provides access to a software library containing around 40.000 packages. All these packages contain applications or tools, and can be easily downloaded and installed. All you need is an Internet connection.
To access the collection of software, start the from the menu. The main window will open:
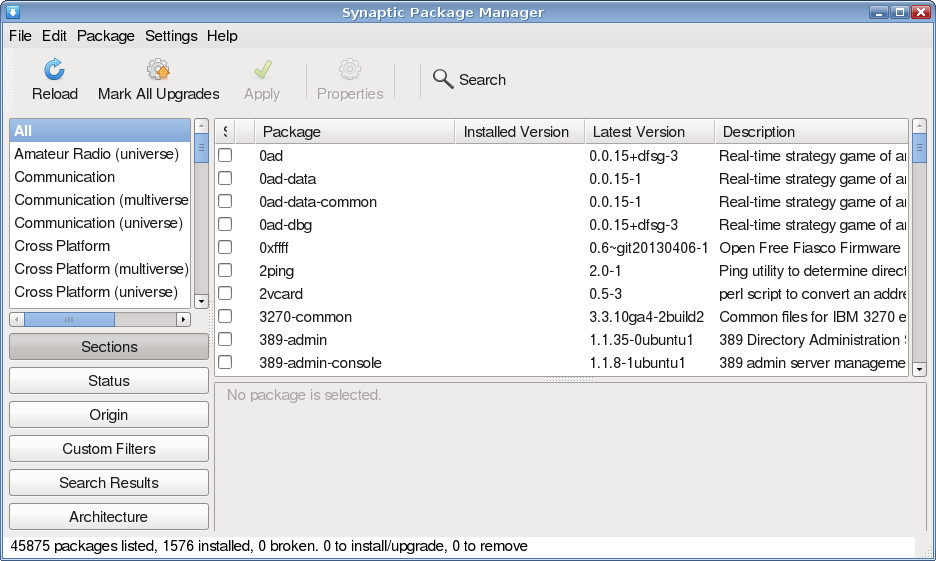
Click the button to refresh the information about the packages.
You can browse through the multiple categories to have an overview of what is available. Hit Ctrl+F to open the search box:
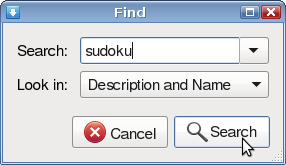
Click the button to start the search. A filtered list of packages will be available in the main window. To install a selected application, follow the following steps:
Right click on the line corresponding to the package, and select in the popup menu:
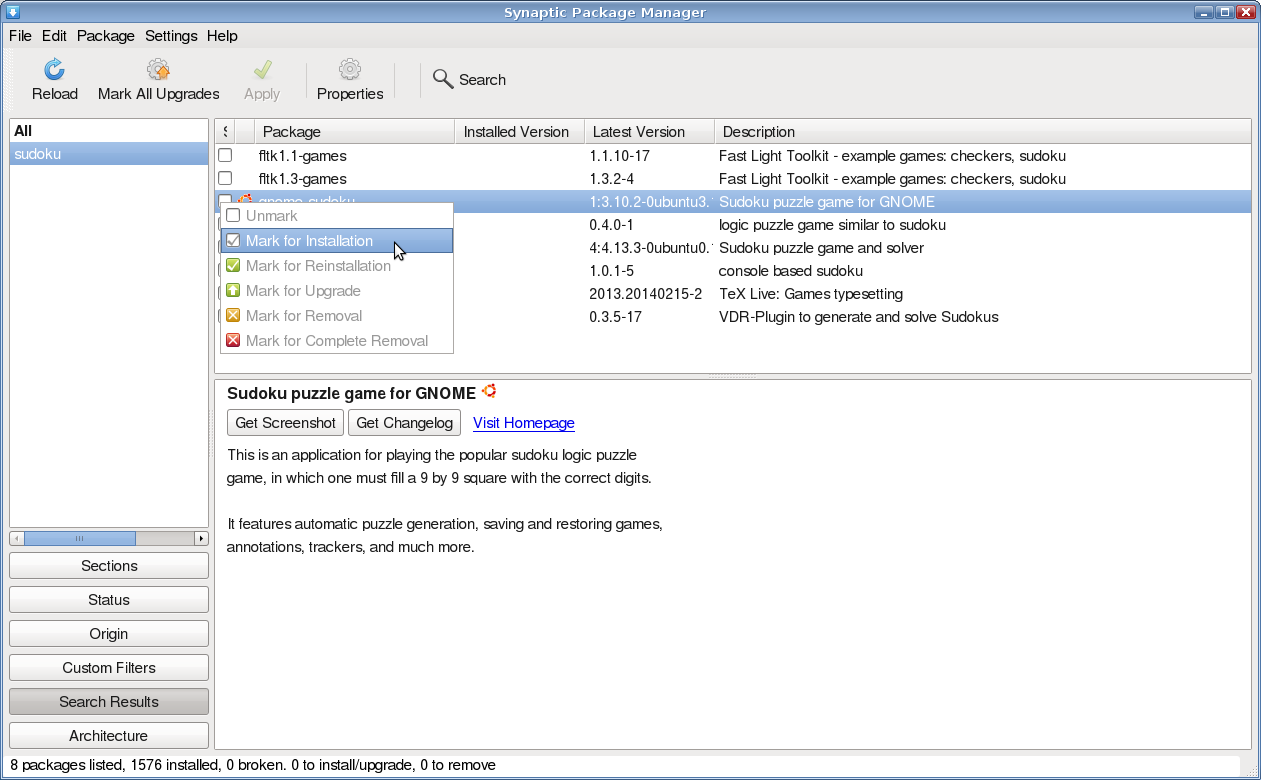
Reproduce the previous step for all the packages you want to install.
Click the to start the installation:

| Warning |
To keep the installed packages after a reboot, make sure to be in persistent mode. |
Using a terminal (PC and Raspberry Pi)
You can also add an application using linux system command :
$ sudo apt-get install packageNameYou can use the key for autocompletion.
Chapter 6. Linutop OS security for lockdown kiosk
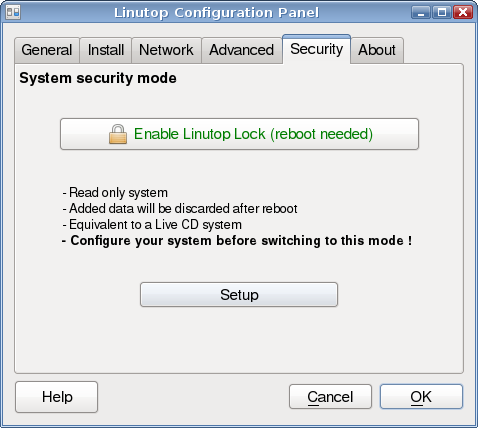
Overview
The Linutop OS 32 bit 14-04-version, offers a security system bound to its internal architecture. It uses the concept of LiveCD, but makes it more flexible.
The system is contained in a single file that can't be modified. No matter what happens on the system, you'll always be able to restore the original state of the system using this file.
By default the Linutop OS behaves like any system. Anything you do is written on disk and will still be there after a reboot. Administration tasks will require a master password.
Switching the system in Lock mode will make all new changes temporary. After having configured the system to your needs, switching to this mode will allow to discard all new changes on reboot. You'll always find the same start at startup.
Lock mode security setup
The choice of the security level can be done in the Linutop Configuration Panel, . Check the box to enable high security.
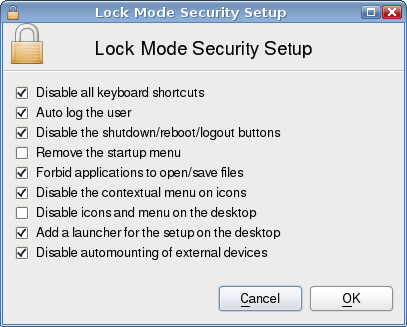
The Lock mode offers additional options:
the admin password can be changed ( button)
security options can be added/removed ( button):
Back to normal mode
To switch back to normal mode, you'll have to execute the Linutop Configuration Panel and uncheck the in the tab.
If you've disable the startup menu and the desktop icons, you can use the Ctrl+Alt+s shortcut.
The password you've defined when you switched to lock mode will be asked to start the application. Don't forget this password!
Halt/Reboot in lock mode
To halt or reboot the system in lock mode, start the Linutop Configuration Panel and go to the tab.
Chapter 7. Hardware
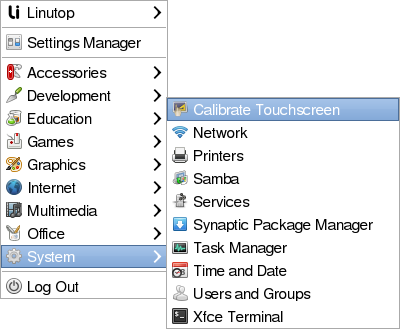
Touch Screens - calibration
The compatibility of touch screens depends on the standards. It should be checked with your Linux:
- PC 32 bit, Xubuntu 14.04
- PC 64 bit, Xubuntu 18.04
- Raspberry Pi, Raspbian Buster
Some screen requires calibration. To do this, start the calibration tool from the menu :
Some touch screens are known to work well:
- ASUS all in one
- ASUS eeetop
- eGalax touch screens
- EloTouch touch screens
- iiyama Pro Lite txx31,32,34
USB Key 4G
The compatibility of 4G keys can be verified on the Internet.
It allows broadband connectivity on a player.
Linutop OS is based on the following versions:
- PC 32 bit, Xubuntu 14.04
- PC 64 bit, Xubuntu 18.04
- Raspberry Pi, Raspbian Buster
A 4G modem is more likely to work raspberry 3 with a stronger USB power supply.
Printers (PC only)
To configure printers, start the tool:
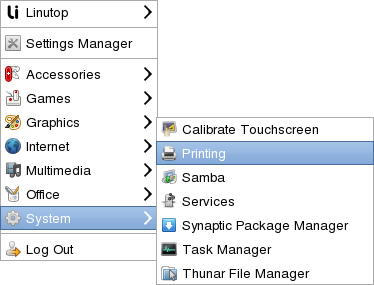
Network printers can also be configured. Here is an exemple for a HP printer:
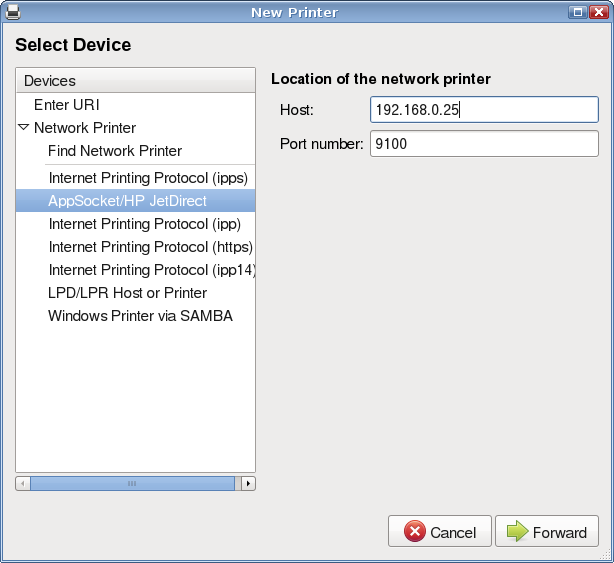
The printer will appear in the main interface list after configuration:

Chapter 8. FAQ
Linutop OS dosen't start?
For PC :
Select the BOOT device in the BIOS. Be sure to use the Proper OS, 32bits or 64bits.
For Raspberry Pi:If the Raspberry Pi hardware is a newer version you may try the .img rather than NOOBS or update the firmware prior to boot.
Otherwise there may be an alteration of the media (SD or USB key) so change media or image and therefore re-download.
I'm prompted a login and a password, what should I use ?
The login is linutop and the password is blank (unless you've activated the lock mode).
Can I disable the screen saver ?
Yes, in the main menu, select . Change the to Disable Screen Saver.
How can I take a screenshot ?
Use Screen capture application in the Accessories menu Use the print screen key to take a snapshot of the whole screen, and alt+print screen to take a snapshot of the active window.
I want a fancy desktop with lots of effects. Is it possible ?
You can enable compiz (if the hardware supports it) in the last tab of the appearance setup tool ( ).
My system is unstable, what can I do ?
On Raspberry, you can have stability problems. Most of the time this is due to the SD card used. We recommend you to use cards with a minimum certification .
Root user and passwords
The root account is not enabled on the Linutop OS. All
administrative tasks need to be executed using sudo:
$ sudo ls /root
$ sudo service ssh restart
If a password is requested, you must use the one of your current user.
gksudo can be used instead of sudo to graphically ask for the user password.
On Linutop OS for PC, the linutop user default password is blank.
On Linutop OS XS (Raspberry Pi) the pi user default password is raspberry.
To enable the root account, set its password:
$ sudo passwd
Chapter 9. Tutorials & tips
Security
Prevent thunar network access
By default thunar can access your network. to secure/prevent this network access for a public kiosk, use the command below.
$ sudo chmod 000 /usr/share/gvfs/mounts/network.mountAnd if you want to put it back:
$ sudo chmod 644 /usr/share/gvfs/mounts/network.mountYou need to restart your computer in order to apply the change.
Thin client
Terminal Services client
The Linutop OS provides tools to run Terminal Services sessions. This can be done by using either Terminal Server Client ( menu), a graphical application, or by using rdesktop.
Using rdesktop will let you automate the connection to the server. To do so, run the autostart configuration tool, select , and define a command like:
$ rdesktop -f -k fr 192.168.1.1This will connect to the TS server 192.168.1.1, display le login screen in fullscreen, and use a french keyboard to transmit key events.
Citrix client
Citrix provides an ICA client for Linux, usable on the Linutop OS. You can download it from their website (select the .deb download). Save the file in your home directory (/home/linutop). This file can now be installed using the dpkg package manager:
open a terminal (in the menu, )
copy the following command and validate with the Enter key:
$ sudo dpkg -i /home/linutop/icaclient*deb
To use the client, start Terminal Server Client ( menu), and select ICA as Protocol.
Linutop OS as server
Setting up a web server
All the commands listed here have to be typed in a terminal (in the menu, ).
Apache HTTP server
To install the Apache web server, install the apache2 package:
$ sudo apt-get install apache2
To make sure it is installed, start firefox and go to the url http://localhost.
The web pages have to be copied in /var/www by default.
PHP
To install PHP, install the libapache2-mod-php5 package:
$ sudo apt-get install libapache2-mod-php5
To make sure it works edit /var/www/test.php:
$ sudo gedit /var/www/test.php
Put this line in the file and save it:
<?php phpinfo(); ?>
Go to http://localhost/test.php in firefox, you should see the PHP informations page.
MySQL Database server
To install a database server (MySQL), install the mysql-server and associated tools:
$ sudo apt-get install mysql-server php5-mysql
A password will be prompted for the root user. It is the MySQL administrator login/password, needed to perform actions on databases.
To install a frontend for the sql server use:
$ sudo apt-get install phpmyadmin
Questions about phpmyadmin configuration will be asked, select apache2 for the first question, select no for the second. Go to http://localhost/phpmyadmin in firefox to use the frontend. The login is root and the password is the MySQL one.